
Introduction
In today's digital age, collaboration and version control are essential tools for any developer. One of the most popular platforms for managing code repositories is GitHub. If you're an Android developer using Android Studio, you might wonder how to push your project to GitHub seamlessly. This guide will walk you through the step-by-step process of setting up your project in Android Studio, initializing a local Git repository, and then pushing it to your GitHub account.
Prerequisites
Before diving into the detailed steps, ensure you have the following prerequisites:
- Android Studio: Ensure the latest version is installed on your computer.
- GitHub Account: Create an account if you don't already have one. Sign up at GitHub.com.
- Git Installed: Download and install Git from the official Git website if it's not already installed on your system. You can download it from Git-scm.com.
Step 1: Setting Up Git
To start using Git with Android Studio, first ensure Git is installed on your system:
-
Download Git:
- Open a web browser and navigate to the Git download page at Git-scm.com.
- Click on the appropriate installer for your operating system (Windows, macOS, or Linux).
- Follow the installation instructions to install Git.
-
Verify Git Installation:
- Open your terminal or command prompt.
- Type
git --versionand press Enter. - If Git is installed correctly, a version number should be displayed.
Step 2: Enabling Version Control Integration in Android Studio
Once Git is installed, enable version control integration in Android Studio:
-
Open Android Studio:
- Launch Android Studio from your desktop or start menu.
-
Go to Settings:
- Click on
Filein the top left corner of the screen. - Select
Settingsfrom the dropdown menu.
- Click on
-
Navigate to Version Control:
- In the settings window, navigate to
Version Controlunder theVersion Controlsection.
- In the settings window, navigate to
-
Enable Git:
- Click on the
Testbutton to test the path to the Git executables. - If everything is set up correctly, a success message indicating proper Git configuration should appear.
- Click on the
-
Update .gitignore File (Optional):
-
The
.ideafolder in your project directory contains IDE-specific configuration files that are not necessary for version control. -
To ignore these files, open your project’s root directory and locate the
.gitignorefile. -
Add the following lines to exclude the entire
.ideafolder:/.idea/caches
/.idea/libraries
/.idea/modules.xml
/.idea/workspace.xml
/.idea/navEditor.xml
/.idea/assetWizardSettings.xml -
Replace these lines with:
/.idea
-
This ensures only necessary files are committed to your repository.
-
Step 3: Creating a GitHub Repository
Before pushing your Android Studio project to GitHub, create a new repository on GitHub:
-
Log In to GitHub:
- Go to GitHub.com and log in with your credentials.
-
Create New Repository:
- Click on the
+icon in the top right corner of the screen. - Select
New repository. - Fill in the required details such as repository name, description, and whether you want it to be public or private.
- Click on
Create repository.
- Click on the
Step 4: Initializing a Local Git Repository
After creating your GitHub repository, initialize a local Git repository in your Android Studio project:
-
Open Your Project in Android Studio:
- Open your Android Studio project by clicking on
Openand selecting your project directory.
- Open your Android Studio project by clicking on
-
Initialize Git Repository:
- In the top right corner of the screen, click on the terminal icon or press
Ctrl+9(Windows) orCmd+9(macOS) to open the terminal. - Type
git add .and press Enter. This command adds all files in your project directory to the staging area.
- In the top right corner of the screen, click on the terminal icon or press
-
Commit Initial Changes:
- Type
git commit -m "Initial commit"and press Enter. This command commits all changes with an initial commit message.
- Type
-
Link Your Local Repository with GitHub:
- Type
git remote add origin https://github.com/your-username/your-repo-name.gitand press Enter. Replaceyour-usernameandyour-repo-namewith your actual GitHub username and repository name.
- Type
-
Push Changes to GitHub:
- Type
git push -u origin masterand press Enter. This command pushes all committed changes to your GitHub repository and sets up the tracking information.
- Type
Step 5: Pushing Changes from Android Studio
If you prefer using Android Studio's UI for pushing changes, follow these steps:
-
Open Version Control Window:
- Go to
VCSin the top menu bar and selectShare Project on GitHub.
- Go to
-
Enter Repository Details:
- Enter your repository name and description.
- Click on
Share.
-
Authenticate with GitHub:
- You will be prompted to log in with your GitHub credentials or use a personal access token.
- Follow the instructions to authenticate.
-
Push Changes:
- Once authenticated, click on
Push.
- Once authenticated, click on
Step 6: Managing .gitignore File
Managing which files are committed to your repository using the .gitignore file is important:
-
Create .gitignore File:
- In your project’s root directory, create a new file named
.gitignore.
- In your project’s root directory, create a new file named
-
Add Ignored Files/Folders:
-
Add lines specifying which files or folders should be ignored by Git. For example:
*.iml
.gradle
local.properties
.idea/
.DS_Store
build/
captures/
.externalNativeBuild -
These lines will exclude unnecessary files and folders from being committed.
-
-
Update Existing .gitignore File (Optional):
- If you already have an existing
.gitignorefile, update it with these lines to ensure all unnecessary files are ignored.
- If you already have an existing
Additional Tips
- Use Branches: When working on a project, it's good practice to use branches for different features or bug fixes. This helps keep your main branch clean and ensures that changes are reviewed before they are merged into the main branch.
- Commit Messages: Write descriptive commit messages that explain what changes were made in each commit. This helps other developers understand the history of your codebase.
- Pull Requests: If you're contributing to an open-source project or working with a team, use pull requests to review changes before they are merged into the main branch.
By following these best practices and the steps outlined in this guide, you'll be able to efficiently manage your Android Studio projects using GitHub and collaborate effectively with other developers.
Introduction to Android Studio GitHub Integration
This feature allows developers to push their Android Studio projects to GitHub. It simplifies the process of sharing code, collaborating with others, and maintaining version control. Key functionalities include committing changes, creating repositories, and managing branches directly from the Android Studio interface. This integration ensures seamless synchronization between local projects and remote repositories, enhancing productivity and collaboration.
Necessary Tools and Compatibility
To use Android Studio and push your projects to GitHub, your device needs to meet certain requirements. First, ensure your operating system is compatible. Windows 7/8/10 (64-bit), macOS 10.14 or higher, or Linux with GNOME or KDE desktop environments are supported.
Your processor should be a multi-core CPU with at least 8 GB of RAM. However, 16 GB is recommended for smoother performance. For storage, you need at least 4 GB of disk space for Android Studio, plus 1 GB for the Android SDK and emulator system images. A solid-state drive (SSD) is highly recommended for faster performance.
Ensure your graphics card supports OpenGL ES 2.0. For Windows, you need a 64-bit version of Java Development Kit (JDK) 8. For macOS and Linux, the latest version of the JDK is recommended.
To push to GitHub, you need a GitHub account and Git installed on your device. Android Studio integrates with Git, so make sure you configure your GitHub credentials within the IDE.
Lastly, a stable internet connection is crucial for downloading necessary components and pushing your code to GitHub.
Configuring Your Android Studio for GitHub
- Open Android Studio.
- Open your project.
- Click on VCS in the top menu.
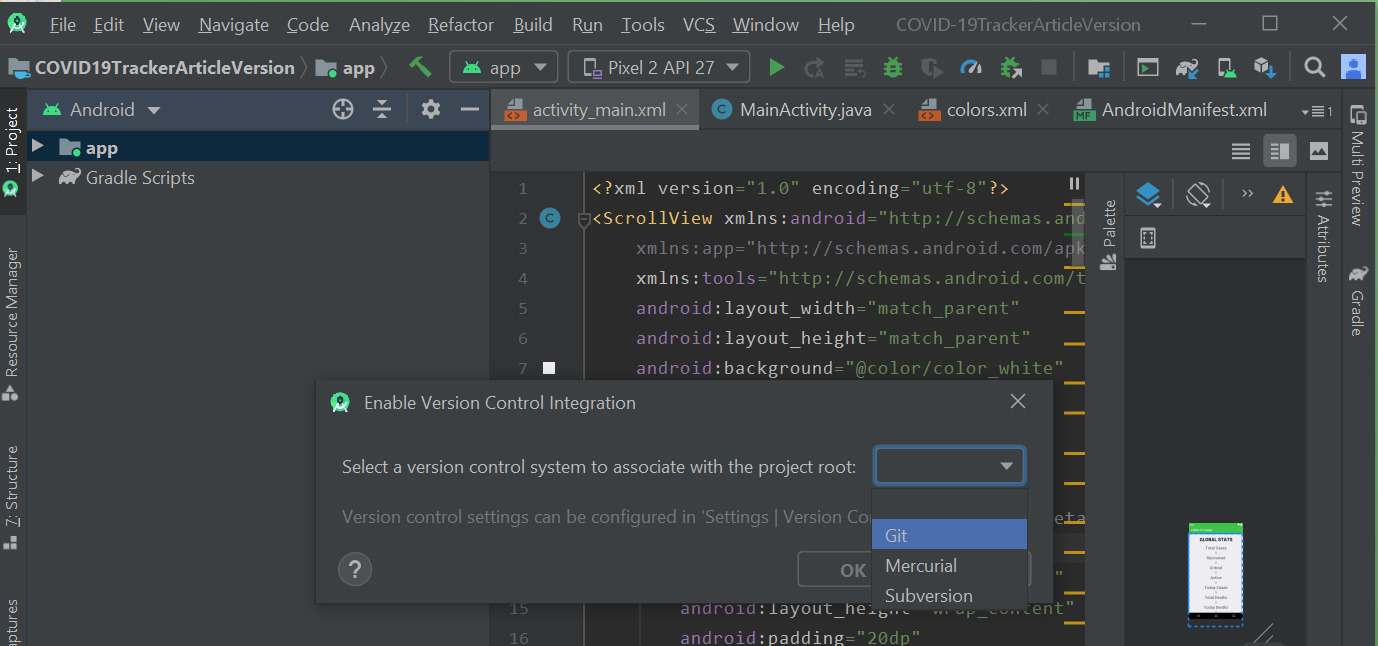
- Select Enable Version Control Integration.
- Choose Git from the dropdown menu.
- Click OK.
- Go to VCS again.
- Select Import into Version Control.
- Click Share Project on GitHub.
- Log in to your GitHub account.
- Enter your repository name.
- Click Share.
- Commit your files.
- Click Commit and Push.
- Confirm push by clicking Push.
Done! Your project is now on GitHub.
Maximizing Efficiency with GitHub in Android Studio
Set Up GitHub: First, create a GitHub account if you don't have one. Then, generate a personal access token for authentication.
Install Git: Ensure Git is installed on your computer. You can download it from the official Git website.
Initialize Git Repository: In Android Studio, go to VCS > Enable Version Control Integration. Choose Git and click OK.
Commit Changes: Make sure to commit your changes frequently. Use meaningful commit messages to keep track of changes.
Create Repository on GitHub: Go to GitHub and create a new repository. Copy the repository URL.
Add Remote: In Android Studio, go to VCS > Git > Remotes. Click the + button to add a new remote. Paste the repository URL.
Push Code: To push your code, go to VCS > Git > Push. Select the branch you want to push and click Push.
Branch Management: Use branches for different features or bug fixes. This keeps the main branch stable. Create a new branch by going to VCS > Git > Branches > New Branch.
Pull Requests: When a feature is complete, create a pull request on GitHub. This allows for code review before merging into the main branch.
Resolve Conflicts: If there are merge conflicts, Android Studio will highlight them. Resolve conflicts by editing the files and then commit the changes.
Sync Regularly: Regularly pull changes from the remote repository to keep your local repository up-to-date. Go to VCS > Git > Pull.
Use .gitignore: Add a .gitignore file to exclude files that shouldn't be tracked, like build files or local configuration files.
Backup: Always keep a backup of your code. Push changes to GitHub frequently to avoid losing work.
Collaborate: Use GitHub issues and project boards to manage tasks and collaborate with team members.
Documentation: Document your code and processes. This helps new team members understand the project quickly.
Security: Never commit sensitive information like passwords or API keys. Use environment variables or configuration files excluded by .gitignore.
Automate: Use GitHub Actions to automate tasks like running tests or deploying code. This ensures consistency and saves time.
Review: Regularly review your repository for unused branches or outdated code. Clean up to keep the repository organized.
Learn: Continuously learn about Git and GitHub features. They offer powerful tools that can improve your workflow.
Feedback: Encourage team members to give feedback on commits and pull requests. This fosters a collaborative environment and improves code quality.
Troubleshooting Frequent Problems
Problem: Authentication Failed
- Solution: Check your GitHub username and password. If using two-factor authentication, generate a personal access token and use it instead of your password.
Problem: Repository Not Found
- Solution: Ensure the repository URL is correct. Verify you have access to the repository.
Problem: Merge Conflicts
- Solution: Pull the latest changes from the remote repository. Resolve conflicts in the affected files, then commit and push again.
Problem: Push Rejected Due to Non-Fast-Forward Updates
- Solution: Pull the latest changes from the remote repository. Merge any changes locally, then push your updates.
Problem: Large File Size Error
- Solution: Use Git Large File Storage (LFS) for large files. Alternatively, reduce the file size before committing.
Problem: SSL Certificate Problem
- Solution: Update your Git to the latest version. Configure Git to trust the certificate by running
git config --global http.sslVerify false.
- Solution: Update your Git to the latest version. Configure Git to trust the certificate by running
Problem: Permission Denied (Public Key)
- Solution: Add your SSH key to your GitHub account. Ensure the SSH agent is running and the key is loaded.
Problem: Remote: Repository Not Found
- Solution: Double-check the repository URL. Confirm you have permission to access the repository.
Problem: Cannot Push to Protected Branch
- Solution: Check branch protection rules on GitHub. Push changes to a different branch or request necessary permissions.
Problem: GitHub API Rate Limit Exceeded
- Solution: Wait for the rate limit to reset. Use authenticated requests to increase your rate limit.
Protecting Your Code and Data
When using Android Studio to push code to GitHub, user data handling becomes crucial. GitHub stores your code, so ensure sensitive information like passwords or API keys aren't included in your commits. Use .gitignore files to exclude such data. Enable two-factor authentication (2FA) on your GitHub account for added security. Regularly review your repository settings to control who has access. Avoid using public Wi-Fi when pushing code to prevent data interception. Encrypt your local storage to protect your codebase. Always keep your Android Studio and Git updated to patch any security vulnerabilities.
Comparing Other Version Control Options
Pros of Android Studio:
- Integrated Development Environment (IDE): Offers a complete suite for Android app development.
- Emulator: Built-in emulator for testing apps on various devices.
- Code Editor: Advanced code editor with features like code completion and refactoring.
- Debugging Tools: Comprehensive debugging tools for finding and fixing issues.
- Version Control: Integrated Git support for version control.
Cons of Android Studio:
- Resource Intensive: Requires a powerful computer to run smoothly.
- Steep Learning Curve: Can be complex for beginners.
- Slow Performance: Sometimes slow, especially on less powerful machines.
- Frequent Updates: Regular updates can disrupt workflow.
Alternatives:
Xcode (for iOS):
- Pros: Seamless integration with Apple devices, user-friendly interface, excellent performance.
- Cons: Only available on macOS, limited to iOS development.
Visual Studio Code:
- Pros: Lightweight, supports multiple programming languages, extensive extensions.
- Cons: Requires additional setup for Android development, lacks built-in emulator.
IntelliJ IDEA:
- Pros: Powerful code editor, supports multiple languages, robust plugin ecosystem.
- Cons: Not specifically tailored for Android, can be expensive.
Eclipse with ADT Plugin:
- Pros: Open-source, customizable, supports various programming languages.
- Cons: Outdated compared to Android Studio, less intuitive interface.
Conclusion:
Android Studio excels in Android app development but demands significant resources and has a steep learning curve. Alternatives like Xcode, Visual Studio Code, IntelliJ IDEA, and Eclipse offer different strengths and weaknesses, catering to various development needs.
H2: Final Steps
Pushing your Android Studio project to GitHub isn't rocket science. Start by creating a repository on GitHub. Next, open Android Studio, go to VCS, and select "Import into Version Control." Choose "Share Project on GitHub," then follow the prompts to link your GitHub account. After that, commit your changes and push them to the repository.
Remember to keep your commits meaningful and frequent. This helps in tracking changes and makes collaboration easier. If you run into issues, check your internet connection or GitHub permissions.
Regularly updating your repository ensures your project stays current and accessible. This practice not only safeguards your work but also makes it easier to collaborate with others.
By following these steps, you can efficiently manage your Android projects and keep them synced with GitHub, making development smoother and more organized.
How do I connect Android Studio to GitHub?
Open Android Studio, go to File > Settings (or Preferences on macOS). Under Version Control, select GitHub. Enter your GitHub credentials and click Test to ensure the connection works.
How do I create a new repository on GitHub from Android Studio?
In Android Studio, click VCS > Import into Version Control > Share Project on GitHub. Enter the repository name, description, and click Share. Your project will be pushed to a new GitHub repository.
How do I push changes to an existing GitHub repository?
Make sure your project is already linked to a GitHub repository. Click VCS > Commit to commit your changes. Then, click VCS > Git > Push to push the changes to GitHub.
What should I do if I encounter merge conflicts?
If you face merge conflicts, Android Studio will show a notification. Click on it to open the Merge Conflicts dialog. Resolve conflicts by choosing which changes to keep, then commit and push the resolved files.
How do I clone a GitHub repository in Android Studio?
Go to File > New > Project from Version Control > GitHub. Enter the repository URL and your GitHub credentials. Click Clone to download the repository to your local machine.
Can I manage branches in Android Studio?
Yes, you can. Click VCS > Git > Branches. From there, you can create, switch, merge, or delete branches.
How do I pull updates from a GitHub repository?
To pull updates, click VCS > Git > Pull. This will fetch and merge changes from the remote repository into your local project.