
Why Rename an Android Studio Project?
Understanding the reasons behind renaming a project can help clarify the process. Here are some common scenarios:
- Client Requirements Change: Client needs may evolve, requiring a change in the project's identity.
- Customization: Customizing a boilerplate template or downloaded code often involves changing the project name.
- Organization: Renaming projects aids in better organization, especially when managing multiple projects.
Method 1: Renaming the Project Directory and Updating Configuration Files
This method involves changing the project directory name and manually updating configuration files.
Step-by-Step Guide
-
Open the Project Directory:
- Right-click the project name in Android Studio and select "Show in Explorer" (or "Show in Finder" on macOS).
- This action opens the project directory in your file explorer.
-
Close Android Studio:
- Close Android Studio to avoid conflicts while renaming the directory.
-
Rename the Root Folder:
- Navigate to the project directory in your file explorer and rename the root folder to the desired new name.
-
Open Android Studio:
- Open Android Studio and select "Open an existing Android Studio project" from the start-up screen.
- Navigate to the newly renamed project directory and open it.
-
Clean the Project:
- Click "Build" from the top toolbar and select "Clean Project." This clears caches and rebuilds the project with the new name.
-
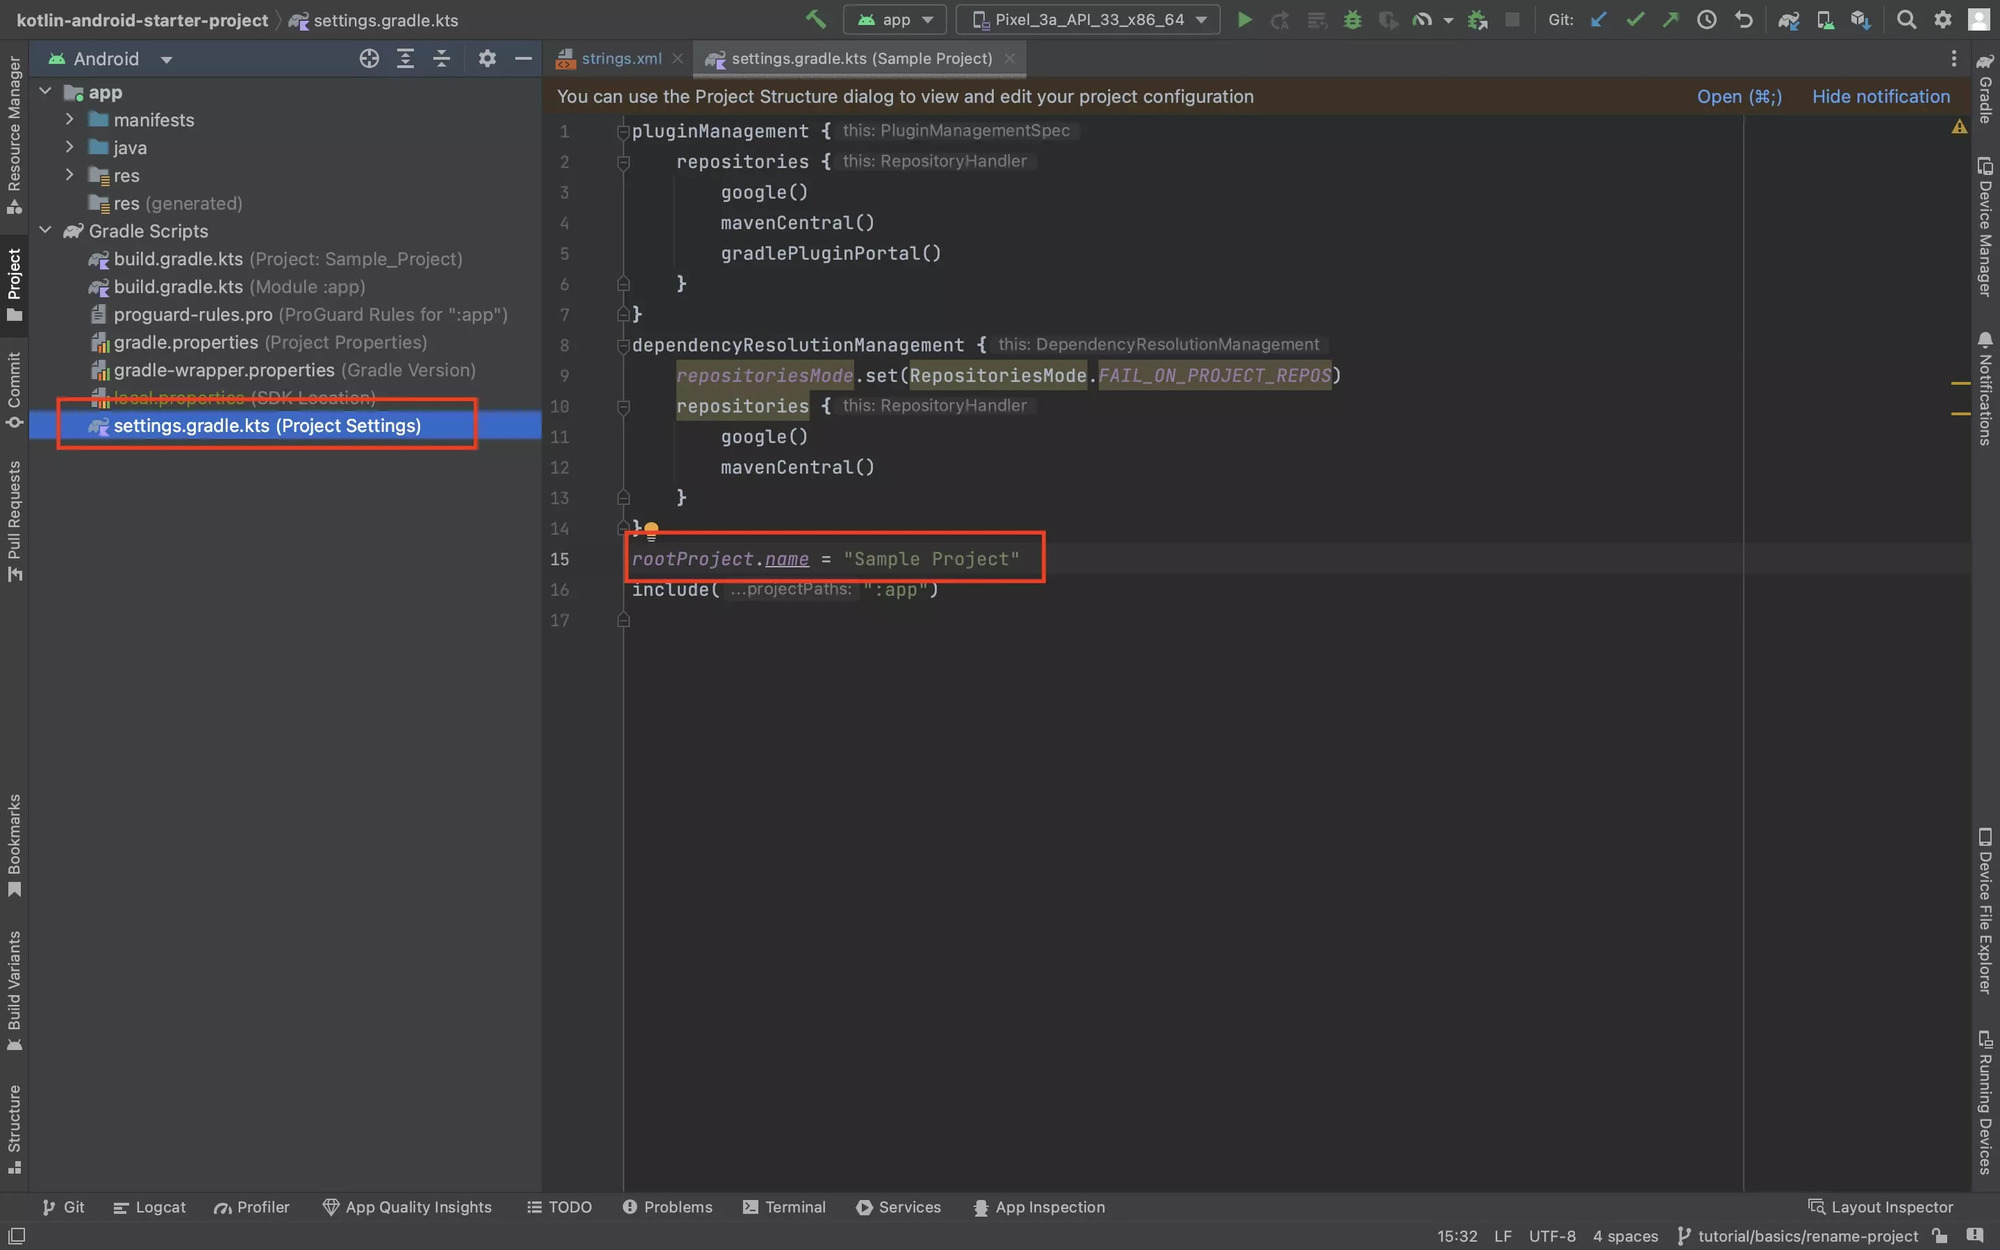
Update settings.gradle:
- Open the
settings.gradlefile located in the root of your project directory. - Change
rootProject.nameto your new project name and sync it.
- Open the
-
Update build.gradle:
- Open the
build.gradlefile in the app module directory. - Update
applicationIdto reflect your new project name without spaces. For example, if the new project name is "MyNewProject," setapplicationIdto"com.example.mynewproject".
- Open the
-
Update AndroidManifest.xml:
- Open the
AndroidManifest.xmlfile in the app module directory. - Change the
packageattribute to reflect your new project name without spaces. For example, if the new project name is "MyNewProject," set the package to"com.example.mynewproject".
- Open the
-
Update Strings.xml:
- Open the
strings.xmlfile in the app module directory. - Update the
<string name="app_name">tag to reflect your new project name.
- Open the
-
Sync and Rebuild:
- After making all these changes, sync your project by clicking "Sync Now" in the toolbar.
- Rebuild your project by clicking "Build" > "Rebuild Project."
Method 2: Using Refactor > Rename
This method leverages Android Studio's built-in refactoring tools to rename the project.
Step-by-Step Guide
-
Uncompact Middle Packages:
- Click the setting icon in the top-right corner of Android Studio and uncheck "Compact Middle Packages." This makes it easier to see and rename packages.
-
Rename Project:
- Click your project name in the project window and go to "Refactor" > "Rename."
- In the dialog box that appears, enter your new project name and click "Rename."
-
Rename Packages:
- After renaming the project, you might need to rename packages as well. Go back to "Refactor" > "Rename" and select "Rename Packages."
- This prompts you to change all occurrences of the old package name to the new one.
-
Sync and Rebuild:
- After renaming packages, click "Sync Now" in the toolbar to update all configuration files.
- Rebuild your project by clicking "Build" > "Rebuild Project."
Method 3: Updating Configuration Files Manually
This method involves manually updating specific configuration files without using built-in refactoring tools.
Step-by-Step Guide
-
Update settings.gradle:
- Open the
settings.gradlefile and changerootProject.nameto your new project name.
- Open the
-
Update build.gradle:
- Open the
build.gradlefile in the app module directory and updateapplicationIdto reflect your new project name without spaces.
- Open the
-
Update AndroidManifest.xml:
- Open the
AndroidManifest.xmlfile and change thepackageattribute to reflect your new project name without spaces.
- Open the
-
Update Strings.xml:
- Open the
strings.xmlfile and update the<string name="app_name">tag to reflect your new project name.
- Open the
-
Sync and Rebuild:
- After making all these changes, sync your project by clicking "Sync Now" in the toolbar.
- Rebuild your project by clicking "Build" > "Rebuild Project."
Additional Tips
Handling Gradle Issues
Renaming a project can sometimes cause issues with Gradle. If you encounter errors like "Project 'AndroidApp' not found in root project 'MyApplicationProject'," follow these steps:
-
Check build.gradle Files:
- Ensure all
build.gradlefiles are updated correctly with the new project name. - Specifically, check for any dependencies or repositories that might still reference the old project name.
- Ensure all
-
Update settings.gradle:
- Verify that
settings.gradleincludes the new project name correctly.
- Verify that
-
Clean and Rebuild:
- Clean the project by clicking "Build" > "Clean Project."
- Rebuild the project by clicking "Build" > "Rebuild Project."
Renaming Packages
When renaming packages, updating all references is crucial to avoid errors. Here’s how you can do it:
-
Use Refactor > Rename:
- Go to "Refactor" > "Rename" and select "Rename Packages."
- This prompts you to change all occurrences of the old package name to the new one.
-
Manual Update:
- If you prefer manual updates, open each file where the old package name is used and replace it with the new one.
Final Checklist
-
Rename Root Folder:
- Rename the root folder of your project directory.
-
Update settings.gradle:
- Change
rootProject.nameinsettings.gradle.
- Change
-
Update build.gradle:
- Update
applicationIdinbuild.gradle.
- Update
-
Update AndroidManifest.xml:
- Change the
packageattribute inAndroidManifest.xml.
- Change the
-
Update Strings.xml:
- Update the
<string name="app_name">tag instrings.xml.
- Update the
-
Sync and Rebuild:
- Sync your project by clicking "Sync Now."
- Rebuild your project by clicking "Build" > "Rebuild Project."
By following this guide, you'll be able to rename your Android Studio project efficiently and ensure that all necessary files and directories are updated correctly.