
Introduction
When developing applications in Android Studio, one of the essential tools for debugging and testing is the console. The console, specifically the Logcat window, serves as a critical component for printing messages and debugging issues within your application. This guide will cover various methods and techniques for printing to the console in Android Studio, ensuring you have a comprehensive understanding of how to use this powerful tool effectively.
Understanding Logcat
Logcat is a window in Android Studio that displays system information and messages added to your Log class. It is the primary console for Android development, providing real-time messages and keeping a history of all logs. This feature is indispensable for debugging and testing your application, as it allows you to track the flow of your code and identify any errors or issues that may arise.
Logcat Window
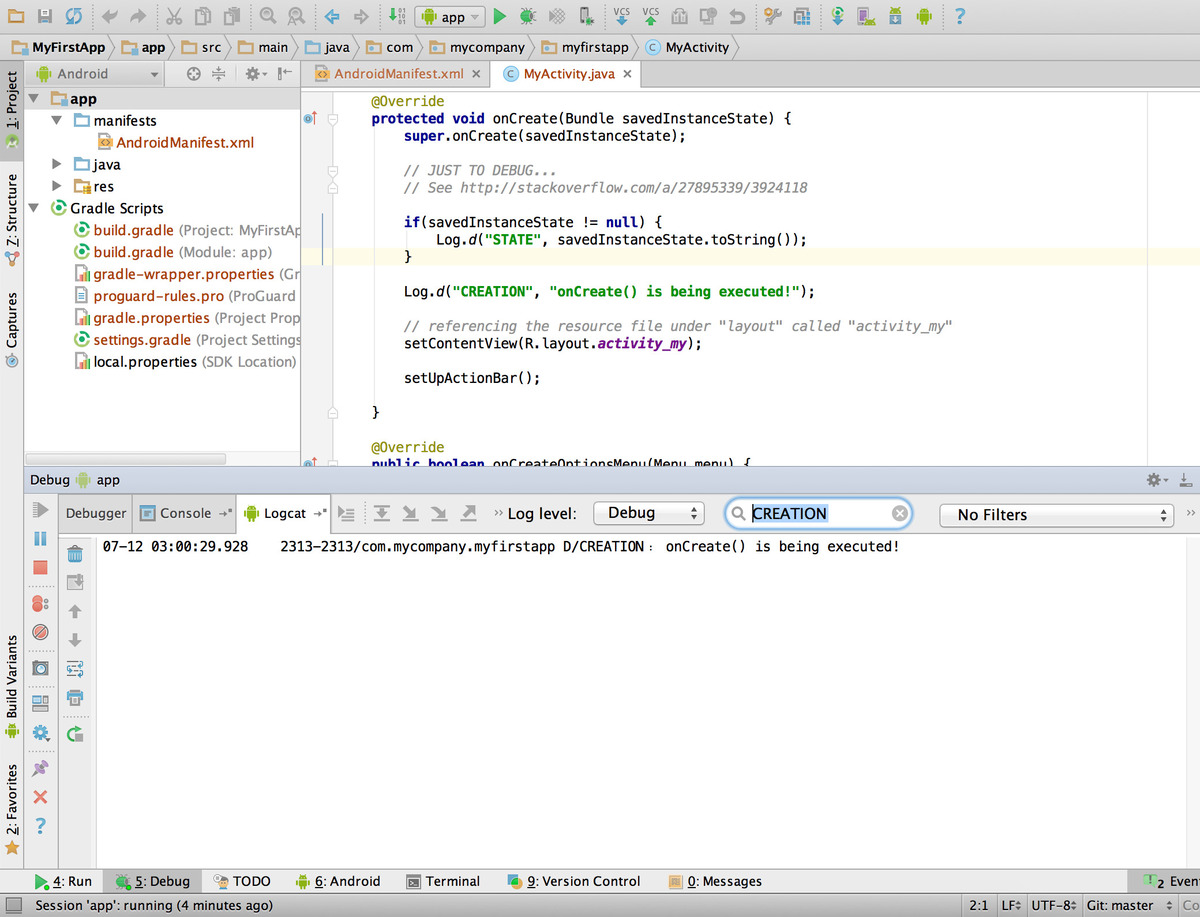
The Logcat window is located at the bottom of the Android Studio interface. It includes several buttons and options that help you manage and filter the logs:
- Clear Logcat: Clears the visible Logcat window.
- Scroll to the End: Takes you to the end of the logcat window, where you can see the latest messages.
- Up the Stack Trace and Down the Stack Trace: Navigates up and down the stack traces in the log.
- Use Soft Wraps: Enables line wrapping and prevents horizontal scrolling.
- Print: Prints logcat messages on paper or saves them as a PDF.
- Restart: Clears the log and restarts it.
- Logcat Header: Opens customization options for log messages.
- Screen Capture: Captures the logcat window as an image.
- Screen Record: Records a video up to 3 minutes of the logcat window.
Filtering Logs
To make the most of Logcat, you can filter the logs based on specific criteria. This is particularly useful when dealing with large amounts of data. Here are the steps to filter logs:
- Show Only Selected Applications: Displays messages generated by the app code only.
- No Filters: Applies no filters.
- Edit Filter Configurations: Modify your custom filter or create new filters.
By using these filters, you can focus on the logs that are most relevant to your current task, making it easier to identify and debug issues.
Using Log Statements
In Android, you use the Log class to print messages to the console. The Log class provides several methods for different levels of logging, each serving a specific purpose:
- Log.d (Debug): Used for information that may be useful when addressing an issue.
- Log.e (Error): Used for something that went seriously wrong.
- Log.w (Warn): Used for less severe than an error but still needs to be fixed.
- Log.i (Info): Used when you need to provide information.
- Log.v (Verbose): The least specific log level, used for detailed information.
Here is an example of how to use these methods in your code:
java
import android.util.Log;
public class MainActivity extends AppCompatActivity {
@Override
protected void onCreate(Bundle savedInstanceState) {
super.onCreate(savedInstanceState);
setContentView(R.layout.activity_main);
    // Example of using Log statements
    Log.d("myTag", "This is a debug message");
    Log.e("myTag", "This is an error message");
    Log.w("myTag", "This is a warning message");
    Log.i("myTag", "This is an info message");
    Log.v("myTag", "This is a verbose message");
}
}
In Kotlin, you can use the same approach:
kotlin
import android.util.Log
class MainActivity : AppCompatActivity() {
override fun onCreate(savedInstanceState: Bundle?) {
super.onCreate(savedInstanceState)
setContentView(R.layout.activity_main)
    // Example of using Log statements
    Log.d("myTag", "This is a debug message")
    Log.e("myTag", "This is an error message")
    Log.w("myTag", "This is a warning message")
    Log.i("myTag", "This is an info message")
    Log.v("myTag", "This is a verbose message")
}
}
Searching for Log Messages
One of the most powerful features of Logcat is its ability to search for specific messages. This can be done using a regular expression search pattern. Here’s how you can do it:
- Open the Logcat Window: Click on the Logcat button at the bottom of the Android Studio interface.
- Type in the Search Field: Enter the tag or message you want to search for.
- Press Enter: The search results will be displayed.
If you want to store the search string in this session, press Enter after typing the search string.
Printing Variables
While the Log class is primarily used for logging messages, you might need to print variables or values directly to the console for debugging purposes. However, Android does not support System.out.println() directly. Instead, you can use the Log class with a custom tag and message format.
Here’s an example of how to print a variable:
java
import android.util.Log;
public class MainActivity extends AppCompatActivity {
@Override
protected void onCreate(Bundle savedInstanceState) {
super.onCreate(savedInstanceState);
setContentView(R.layout.activity_main);
    // Example of printing a variable
    int myVariable = 10;
    Log.d("myTag", "Value of myVariable: " + myVariable);
}
}
In Kotlin, you can achieve the same result:
kotlin
import android.util.Log
class MainActivity : AppCompatActivity() {
override fun onCreate(savedInstanceState: Bundle?) {
super.onCreate(savedInstanceState)
setContentView(R.layout.activity_main)
    // Example of printing a variable
    val myVariable = 10
    Log.d("myTag", "Value of myVariable: $myVariable")
}
}
Using Logcat in Debug Mode
To see the output of your logs, you need to run your application in debug mode. Here’s how you can do it:
- Run Your Application: Click on the Run button in the top menu of Android Studio.
- Select Debug Mode: In the bottom status bar, click on the Debug button next to the Run button.
- Select Logcat Console: Now you should select the Logcat console.
By following these steps, you will be able to see all the logs generated by your application in real-time.
Advanced Logging Techniques
While basic logging is essential, there are times when you need more advanced techniques to handle large amounts of data or specific logging requirements. Here are some advanced techniques:
Truncation Issues
One common issue with logging is truncation. Logcat truncates messages after ~4,076 bytes, which can cause headaches if you're printing out large amounts of data. To get around this, you need to write a function that breaks it up into multiple parts. Here’s an example:
java
import android.util.Log;
public class MainActivity extends AppCompatActivity {
@Override
protected void onCreate(Bundle savedInstanceState) {
super.onCreate(savedInstanceState);
setContentView(R.layout.activity_main);
    // Example of handling truncation
    String largeData = "This is a very large string that needs to be broken down into multiple parts.";
    breakDownLargeData(largeData);
}

private void breakDownLargeData(String data) {
    int chunkSize = 4000; // Adjust this value based on your needs
    for (int i = 0; i < data.length(); i += chunkSize) {
        String chunk = data.substring(i, Math.min(i + chunkSize, data.length()));
        Log.d("myTag", "Chunk: " + chunk);
    }
}
}
In Kotlin, you can achieve the same result:
kotlin
import android.util.Log
class MainActivity : AppCompatActivity() {
override fun onCreate(savedInstanceState: Bundle?) {
super.onCreate(savedInstanceState)
setContentView(R.layout.activity_main)
    // Example of handling truncation
    val largeData = "This is a very large string that needs to be broken down into multiple parts."
    breakDownLargeData(largeData)
}

private fun breakDownLargeData(data: String) {
    val chunkSize = 4000 // Adjust this value based on your needs
    for (i in 0 until data.length step chunkSize) {
        val chunk = data.substring(i, Math.min(i + chunkSize, data.length))
        Log.d("myTag", "Chunk: $chunk")
    }
}
}
Attaching Debugger to Android Process
If your app is launched from a device, not from the IDE, you can attach the debugger later in the menu:
- Run -> Attach Debugger to Android Process.
This can be useful when debugging notifications on a closed application.
Final Thoughts
Printing to the console in Android Studio is a crucial part of the development process. By understanding how to use Logcat effectively and leveraging the Log class, you can debug and test your applications with precision. Whether you're dealing with basic logging or advanced techniques like handling truncation, this guide has provided you with the necessary tools and knowledge to master console printing in Android Studio.
Effective debugging lies in being able to identify and track issues efficiently. By utilizing the features of Logcat and the Log class, you can ensure that your applications are robust, reliable, and meet the highest standards of quality.