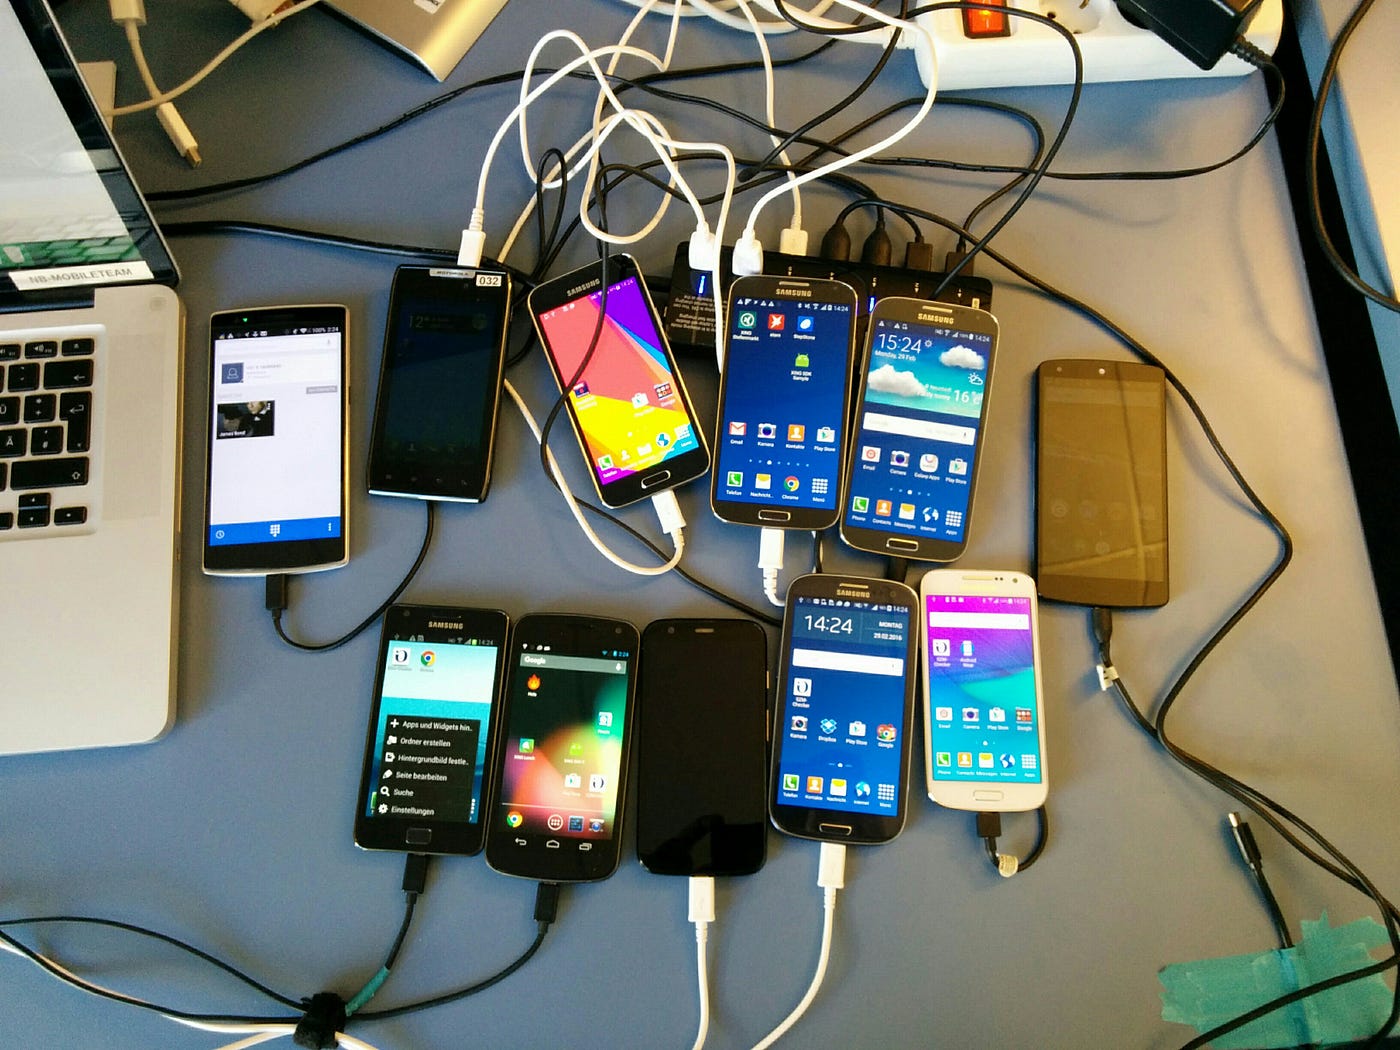
Android Device Testing Hub

Android Studio
android-device-testing-hub
Source: Tech.new-work.se

Introduction to Android Device Testing

Importance of Device Testing

Testing on real devices is crucial for app development. Real devices provide accurate results that emulators can't always replicate. They help identify issues related to hardware, software, and user interactions. Testing on actual devices ensures the app works smoothly across different screen sizes, resolutions, and hardware configurations. It also helps catch bugs that might only appear under real-world conditions, like varying network speeds or battery levels.

Overview of Testing Tools

Various tools are available for Android device testing. Some popular ones include Android Studio, which offers an integrated development environment (IDE) with built-in testing features. There’s also Appium, an open-source tool for automating mobile apps. For performance testing, tools like JMeter and Firebase Test Lab are widely used. These tools help developers ensure their apps are functional, efficient, and user-friendly.

Key Takeaways:

  • Testing apps on real Android devices is super important because it helps catch bugs and make sure the app works well on different phones and tablets.
  • Using tools like Android Studio and Firebase Test Lab makes it easier for developers to test their apps, find problems, and make sure everything runs smoothly before releasing them.

Types of Android Device Testing

Functional Testing

Functional testing checks if the app works as intended. It focuses on user interactions and features, ensuring each function performs correctly. This type of testing is vital because it verifies that the app’s core functionalities, like logging in, making purchases, or sending messages, work without any issues. Functional testing can be manual or automated, depending on the complexity of the app.

Performance Testing

Performance testing measures how well an app performs under various conditions. It looks at factors like load time, responsiveness, and stability. This testing is significant because users expect apps to be fast and reliable. Slow or crashing apps can lead to poor user experiences and negative reviews. Tools like JMeter and Firebase Performance Monitoring help developers identify and fix performance bottlenecks.

Usability Testing

Usability testing evaluates how easy and intuitive the app is for users. It involves observing real users as they interact with the app to identify any usability issues. This type of testing is crucial for enhancing user experience. If users find the app difficult to navigate or confusing, they’re less likely to use it. Usability testing helps ensure the app is user-friendly and meets the needs of its target audience.

Compatibility Testing

Compatibility testing ensures the app works across different devices, operating systems, and network environments. This testing is important because Android devices come in various shapes, sizes, and configurations. An app that works perfectly on one device might have issues on another. Compatibility testing helps identify and fix these issues, ensuring the app functions well for all users, regardless of their device or OS version.

Setting Up Your Testing Environment

Using Android Emulator

Setting up an Android Emulator is a great way to test apps without needing a physical device. Here’s how you can get started:

  1. Install Android Studio: Download and install Android Studio from the official website.
  2. Open AVD Manager: Launch Android Studio, then go to Tools > AVD Manager.
  3. Create a Virtual Device: Click on “Create Virtual Device” and choose a device from the list.
  4. Select a System Image: Pick the Android version you want to test on.
  5. Configure Your Emulator: Adjust settings like RAM, storage, and resolution.
  6. Launch the Emulator: Click “Finish” and then “Play” to start your virtual device.

Using the emulator, you can test various screen sizes, resolutions, and Android versions without needing multiple physical devices.

Connecting Real Devices

Testing on real devices ensures your app works in real-world conditions. Follow these steps to connect and test on actual Android devices:

  1. Enable Developer Options: Go to Settings > About Phone and tap “Build Number” seven times.
  2. Turn on USB Debugging: In Developer Options, enable USB Debugging.
  3. Connect via USB: Plug your device into your computer using a USB cable.
  4. Authorize Connection: On your device, authorize the computer when prompted.
  5. Verify Connection: Open a terminal and type adb devices to see if your device is listed.

Testing on real devices helps catch issues that might not appear on emulators, like hardware-specific bugs.

Installing Necessary Tools

To effectively test Android apps, you’ll need a few essential tools:

  • Android Studio: Integrated development environment (IDE) for Android development.
  • ADB (Android Debug Bridge): Command-line tool to communicate with devices.
  • Gradle: Build automation tool used in Android Studio.
  • Espresso: Testing framework for writing UI tests.
  • JUnit: Framework for unit testing in Java.

Having these tools installed and configured will streamline your testing process and make it more efficient.

Running Standard Android Test Suites

Android Compatibility Test Suite (CTS)

The Android Compatibility Test Suite (CTS) ensures your app meets Android compatibility standards. Here’s how to run it:

  1. Download CTS: Get the latest version from the Android developer website.
  2. Set Up Test Environment: Ensure your device is connected and recognized by ADB.
  3. Run CTS: Use the command cts-tradefed to start the test suite.
  4. Review Results: Check the generated reports to see if your app passes all tests.

CTS helps maintain a consistent user experience across different devices and Android versions.

Android Test Station

Android Test Station is a tool for managing and running tests on multiple devices. To set it up:

  1. Install Android Test Station: Download and install from the official site.
  2. Configure Devices: Connect and configure devices you want to test on.
  3. Create Test Plans: Define the tests you want to run.
  4. Execute Tests: Run your test plans and monitor progress.
  5. Analyze Results: Review detailed reports to identify issues.

This tool is particularly useful for large-scale testing scenarios.

Automated Testing Frameworks

Automated testing frameworks like Espresso and UI Automator streamline the testing process. Here’s a quick overview:

  • Espresso: Ideal for writing concise and reliable UI tests. It synchronizes with the UI thread, ensuring tests run smoothly.
  • UI Automator: Suitable for testing across multiple apps and system UI interactions. It can interact with elements outside your app.

Using these frameworks, you can automate repetitive tests, saving time and reducing human error.

Advanced Testing Techniques

Network Throttling

Network throttling helps developers see how their apps perform under different network conditions. By simulating slow, fast, or unstable connections, you can identify potential issues that might affect users. Tools like Chrome DevTools or Android Studio's Network Profiler allow you to mimic various network speeds and latencies. This way, you can ensure your app remains functional and user-friendly, even when the internet connection isn't ideal.

Geolocation Testing

Geolocation testing checks how your app behaves in different locations. This is crucial for apps that rely on location services, like maps or delivery apps. You can simulate different geolocations using tools like Android Emulator or GPS spoofing apps. By testing in various regions, you can verify that your app provides accurate and relevant information to users, no matter where they are.

Debugging Tools

Debugging tools are essential for identifying and fixing issues in your app. Android Studio offers a range of debugging tools, such as Logcat, which provides real-time logs of your app's activity. Breakpoints let you pause your app at specific points to inspect variables and control flow. Using these tools effectively can help you catch bugs early, making your app more stable and reliable.

Integrations and Continuous Testing

Integrating with CI/CD Pipelines

Integrating Android testing with Continuous Integration/Continuous Deployment (CI/CD) pipelines automates the testing process, ensuring that every code change is tested before it goes live. Tools like Jenkins, CircleCI, or GitHub Actions can be configured to run your test suites automatically. This integration helps catch issues early, speeds up development, and maintains high-quality code.

Using Cloud-Based Testing Services

Cloud-based testing services offer access to a wide range of devices and configurations without needing physical hardware. Services like Firebase Test Lab or AWS Device Farm allow you to run tests on real devices in the cloud. This setup ensures your app works across different devices and operating systems, providing a more comprehensive testing environment.

24/7 Support and Maintenance

Continuous testing requires ongoing support and maintenance. Regularly updating your test cases, monitoring test results, and addressing issues promptly keeps your testing process efficient. Having a dedicated team or service for support ensures that any problems are resolved quickly, maintaining the quality and reliability of your app.

Case Studies and Success Stories

Global Enterprises Using Android Testing

Many global enterprises have successfully implemented Android device testing to enhance their app quality. For instance, companies like Spotify and Netflix use extensive testing frameworks to ensure their apps perform well under various conditions. These companies have seen improved user satisfaction and fewer bugs, demonstrating the effectiveness of thorough testing.

Innovative Testing Solutions

Innovative testing solutions, like AI-driven testing tools, are becoming more popular. These tools can automatically generate test cases, identify potential issues, and even suggest fixes. Companies adopting these advanced solutions have reported faster testing cycles and higher accuracy in bug detection, setting new standards in the industry.

Wrapping It Up

In short, Android device testing plays a pivotal role in ensuring apps run smoothly across varied hardware and software environments. By utilizing tools like Android Studio, Appium, and Firebase Test Lab, developers can catch issues early, from performance bottlenecks to usability hiccups. Testing on real devices alongside emulators provides a comprehensive view of how apps behave in real-world conditions. Moreover, integrating testing processes with CI/CD pipelines and using cloud-based services can significantly streamline development, ensuring high-quality releases. Ultimately, thorough testing leads to better user experiences and more reliable, efficient apps.

Feature Overview

This feature tests Android devices to ensure they work properly. It checks performance, battery life, and app compatibility. Users can run diagnostics, monitor system health, and identify issues. The tool also provides reports on device status, helping users maintain optimal performance.

Compatibility and Requirements

To check if your device supports the feature, ensure it meets these requirements:

  1. Operating System: Your device must run Android 8.0 (Oreo) or higher. Older versions won't support the feature.
  2. RAM: At least 2GB of RAM is necessary. Devices with less memory may experience performance issues.
  3. Processor: A quad-core processor or better is required. Dual-core processors might struggle with the feature.
  4. Storage: Ensure you have at least 500MB of free storage. This space is needed for installation and operation.
  5. Screen Resolution: A minimum resolution of 720p (1280x720 pixels) is needed. Lower resolutions may not display the feature correctly.
  6. Internet Connection: A stable Wi-Fi or 4G connection is essential for optimal performance. Slower connections could lead to delays.
  7. Bluetooth: If the feature involves external devices, Bluetooth 4.0 or higher is required.
  8. Permissions: Make sure to grant necessary permissions like location, camera, and microphone if prompted during setup.
  9. Battery: Devices should have a battery capacity of at least 3000mAh to ensure prolonged usage without frequent charging.

Check these criteria to confirm your device's compatibility. If all boxes are ticked, you're good to go!

Feature Setup Guide

  1. Power On: Hold the power button until the screen lights up.
  2. Language Selection: Choose your preferred language from the list.
  3. Wi-Fi Connection: Select your Wi-Fi network, enter the password, and connect.
  4. Google Account: Sign in with your Google account or create one if needed.
  5. Terms and Conditions: Read and accept the terms by tapping "Agree."
  6. Device Protection: Set up a PIN, pattern, or password for security.
  7. Google Services: Choose which Google services you want to enable.
  8. Backup and Restore: Decide if you want to restore apps and data from a previous device.
  9. Additional Settings: Customize settings like notifications, location, and more.
  10. Finish Setup: Tap "Finish" or "Done" to complete the setup process.

Your device is now ready to use!

Effective Usage Tips

Testing apps on Android devices? Use emulators for quick checks but always test on real devices for accurate results. Automate repetitive tests with tools like Appium or Espresso to save time. When testing battery usage, ensure Wi-Fi, Bluetooth, and GPS are on to mimic real-world conditions. Check app performance under different network conditions using network throttling tools.

For UI testing, rotate the screen to see how the app handles orientation changes. Test accessibility features like screen readers to ensure usability for all users. Simulate different screen sizes and resolutions to verify the app looks good on all devices. Clear app data between tests to avoid cached data affecting results.

When testing security, check for data leaks and ensure secure data storage. Test app permissions to make sure they are necessary and correctly implemented. Review crash logs and fix bugs promptly to maintain app stability.

Document your tests and share findings with your team for better collaboration. Stay updated with the latest Android versions and test compatibility regularly.

Troubleshooting Common Issues

Battery draining too fast? Lower screen brightness, close unused apps, and turn off Wi-Fi or Bluetooth when not needed.

Phone overheating? Remove the case, close background apps, and avoid using while charging.

Apps crashing? Clear app cache, update the app, or reinstall it.

Slow performance? Delete unused apps, clear cache, and restart the device.

Wi-Fi not connecting? Restart the router, forget the network, and reconnect.

Bluetooth issues? Turn Bluetooth off and on, unpair and re-pair devices.

Storage full? Delete old files, move photos to cloud storage, and uninstall unused apps.

Screen unresponsive? Restart the device, check for software updates, and remove any screen protectors.

Camera not working? Restart the phone, clear camera app cache, and check for updates.

Can't receive texts? Ensure airplane mode is off, check network signal, and restart the phone.

Privacy and Security Tips

Using this feature, user data is handled with encryption to keep it safe. Always update your device to the latest software version for the best security. Avoid using public Wi-Fi for sensitive tasks. Enable two-factor authentication for an extra layer of protection. Regularly review app permissions and only grant access to necessary information. Use strong, unique passwords for different accounts. Consider installing a reputable security app to monitor threats. Be cautious of phishing attempts and suspicious links. Backup your data frequently to avoid loss.

Comparing Alternatives

Pros:

  • Customization: Android devices offer extensive customization options. Users can change themes, icons, and even the operating system itself.
  • App Variety: Google Play Store has a vast selection of apps, often more than other platforms.
  • Price Range: Android phones come in various price ranges, making them accessible to more people.
  • Hardware Choices: Many manufacturers produce Android phones, providing a wide range of hardware options.
  • Expandable Storage: Many Android phones allow for expandable storage via microSD cards.

Cons:

  • Fragmentation: Different manufacturers and models may have different versions of Android, leading to inconsistent user experiences.
  • Security: Android's open nature can make it more vulnerable to malware and security threats.
  • Bloatware: Many Android phones come with pre-installed apps that can't be removed easily.
  • Updates: Not all Android devices receive timely updates, which can leave some users with outdated software.

Alternatives:

  • iOS (Apple): Offers a more uniform experience with regular updates and strong security features. However, it lacks the same level of customization and comes at a higher price point.
  • Windows Phone: Provides a unique interface and strong integration with Microsoft services. Limited app availability and fewer hardware options make it less popular.
  • HarmonyOS (Huawei): A newer system with a focus on seamless integration across devices. Limited app ecosystem compared to Android and iOS.

Battery draining too fast? Lower screen brightness, close unused apps, and turn off Wi-Fi or Bluetooth when not needed.

Phone overheating? Remove the case, close background apps, and avoid using while charging.

Apps crashing? Clear app cache, update the app, or reinstall it.

Slow performance? Delete unused apps, clear cache, and restart the device.

Wi-Fi not connecting? Restart the router, forget the network, and reconnect.

Bluetooth issues? Turn Bluetooth off and on, unpair and re-pair devices.

Storage full? Delete old files, move photos to cloud storage, and uninstall unused apps.

Screen unresponsive? Restart the device, check for software updates, and remove any screen protectors.

Camera not working? Restart the phone, clear camera app cache, and check for updates.

Can't receive texts? Ensure airplane mode is off, check network signal, and restart the phone.

Final Thoughts on Android Device Testing

Testing Android devices ensures they run smoothly and efficiently. By focusing on performance, battery life, compatibility, and security, users get the best experience. Regular updates and thorough testing help catch bugs early, making devices more reliable.

Automation tools like Appium and Espresso streamline the process, saving time and effort. Manual testing, though time-consuming, catches issues automation might miss. Combining both methods offers a comprehensive approach.

Remember, a well-tested device means fewer headaches down the road. Investing time in proper testing pays off with a smoother, more enjoyable user experience. So, keep those devices updated and tested regularly. Happy testing!

How do I access my Android screen testing?

Open the Phone app, tap the Keypad, and type *#0*#. A diagnostic screen pops up with buttons for various tests. Tap Red, Green, or Blue to test pixel colors. Tap Receiver to check audio, Vibration to try the vibrating feature, and Sensor to test the accelerometer and other sensors.

What is an Android test station?

An Android Test Station is a tool for developers and test engineers. It provides a user interface for running standard Android test suites like the Android Compatibility Test Suite (CTS).

What is an Android testing tool?

Android testing tools and frameworks test apps' functionality, performance, and usability. They help ensure your app works well across different devices and conditions.

Which app should be installed on the Android device to test the app being created?

Use the Android Emulator to test your app on different Android platform versions and screen sizes. It mimics real devices, so you can catch issues before going live.

How can I test my Android app's performance?

Use tools like Android Profiler in Android Studio. It helps monitor CPU, memory, network, and battery usage. This way, you can optimize your app for better performance.

What are some popular Android testing frameworks?

Some popular frameworks include Espresso for UI testing, JUnit for unit testing, and Robolectric for running tests on the JVM. These tools help automate and streamline the testing process.

How do I check for hardware issues on my Android device?

Access the diagnostic screen by typing *#0*# in the Phone app. Use the various test buttons to check hardware components like the screen, speakers, sensors, and more.

Was this page helpful?