
How to Avoid Annoying Ads on Android Emulator
Using an Android emulator on your PC can be a fantastic way to enjoy Android apps without needing a dedicated device. However, one of the most frustrating aspects of using an emulator like BlueStacks is the presence of ads. These ads can be intrusive, disrupting your gaming or app experience and making it less enjoyable. This article will guide you through various methods to disable ads on Android emulators, ensuring a smoother and more enjoyable experience.
Why Do Ads Appear on BlueStacks?
Before diving into the methods to disable ads, it's essential to understand why they appear in the first place. BlueStacks, like many other emulators, relies on ads to generate revenue. These ads can appear during gameplay, in the app drawer, or even as pop-ups. Here are some reasons why ads might be appearing on your BlueStacks:
- Revenue Generation: The primary reason for ads on BlueStacks is to generate revenue. By displaying ads, developers can offset the costs of maintaining and improving the emulator.
- User Experience: While ads can be annoying, they also provide users with free access to many Android apps. This model allows developers to offer premium features or exclusive content without charging users directly.
- Data Collection: Some ads may collect data about your usage patterns, which can be used to improve the overall experience or target specific ads more effectively.
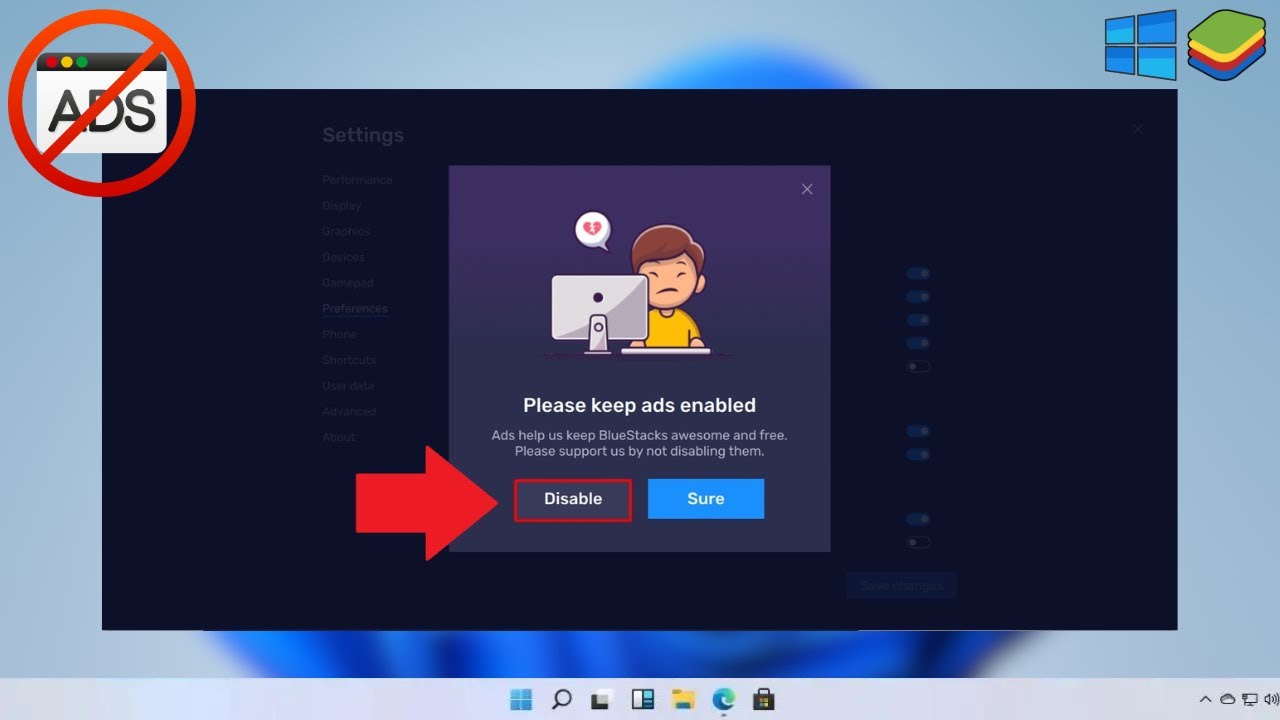
Method 1: Disabling Ads in BlueStacks Settings
One of the simplest ways to disable ads on BlueStacks is by adjusting the settings within the emulator. Here’s how you can do it:
- Open BlueStacks: Launch BlueStacks on your PC.
- Access Settings: Click on the settings icon located at the bottom right corner of the screen.
- Navigate to Preferences: In the settings menu, click on “Preferences.”
- Disable Ads: Look for the option that says “Allow BlueStacks to show ads during gameplay.” Uncheck this option to disable ads.
- Save Changes: Click on “Save Changes” to apply the settings.
If this option is not visible, it might be because you're using an older version of BlueStacks. In such cases, update your emulator to the latest version and then follow these steps again.
Method 2: Using Ad-Blocking DNS Services
Another effective method to block ads on BlueStacks is by using an ad-blocking DNS service. This method requires no additional apps and can be done directly through your network settings.
- Open Network Settings: On your PC, open the network settings.
- Change DNS Provider: Look for the option to change your DNS provider. You can usually find this under “Private DNS” or “Private DNS Provider Hostname.”
- Select AdGuard DNS: Choose “Private DNS Provider Hostname” and enter
dns.adguard.comin the input field. - Save Changes: Click on “Save” to apply the changes.
This method works by redirecting your DNS requests through an ad-blocking service, effectively blocking most ads on your BlueStacks.
Method 3: Using Ad-Blocking Browsers
If you prefer using a browser within your emulator, you can install an ad-blocking browser like Brave or Samsung Internet. These browsers come with built-in ad-blocking capabilities that can significantly reduce the number of ads you see.
- Install Brave Browser: Download and install the Brave browser from the Google Play Store within your BlueStacks.
- Enable Ad-Blocking: By default, Brave has ad-blocking enabled. You can disable it if needed but it's usually not necessary.
- Configure Samsung Internet: For Samsung Internet, you'll need to install a third-party ad blocker like Adblock Plus or AdGuard. Once installed, configure it to work with Samsung Internet.
These browsers are designed to block ads and trackers, providing a cleaner browsing experience.
Additional Tips for Optimizing BlueStacks Performance
While disabling ads is crucial, optimizing your BlueStacks performance can also enhance your experience. Here are some additional tips:
- Adjust Graphics Settings: BlueStacks allows you to adjust graphics settings to improve performance. Lowering the graphics settings can help reduce lag and improve frame rates.
- Clear Cache: Regularly clearing the cache can help remove temporary files that might be slowing down your emulator.
- Uninstall Unwanted Apps: Remove any apps you no longer use to free up space and reduce clutter in your app drawer.
By following these steps and tips, you can significantly reduce the number of ads you see on your BlueStacks, making it a more enjoyable experience for gaming and app usage.
Final Thoughts
Avoiding annoying ads on an Android emulator like BlueStacks is important for an enjoyable user experience. By understanding why ads appear and using the methods outlined above, you can effectively block them and enjoy a smoother, ad-free experience. Whether you choose to disable ads through the emulator settings, use an ad-blocking DNS service, or opt for an ad-blocking browser, there are several effective ways to achieve this. Regularly updating your emulator and optimizing its performance can also help maintain an uninterrupted experience. With these steps, you can regain control over your digital activities and enjoy a more enjoyable experience with your Android emulator.