Android Studio Code: Your Ultimate Resource

Android Studio
android-studio-code-your-ultimate-resource
Source: Developer.android.com

Introduction to Android Studio Code

Overview of Android Studio

Android Studio is the official Integrated Development Environment (IDE) for Android app development. Created by Google, it provides developers with the tools to build, test, and debug Android apps. Think of it as a one-stop shop for everything you need to create an Android app. It includes a code editor, a layout editor, and various tools to help you write and optimize your code.

Importance of Resources in Android Development

Resources in Android development are like the building blocks of your app. They include images, layouts, strings, and other elements that make your app look and function the way it does. Without resources, your app would be just a bunch of code with no visual or interactive elements. They help keep your code clean and organized, making it easier to manage and update your app.

Key Takeaways:

  • Android Studio is like a super tool for making Android apps, helping you write, test, and fix your code all in one place.
  • Keeping your app's resources like images and text organized makes it easier to manage and ensures your app looks great on all devices.

Getting Started with Android Studio

Installation and Setup

To get started with Android Studio, you'll first need to download it from the official Android developer website. Once downloaded, open the installer and follow the on-screen instructions. You'll need to agree to the terms and conditions, choose an installation location, and select the components you want to install. After installation, launch Android Studio and complete the initial setup wizard, which will guide you through configuring the IDE and downloading necessary components.

Creating a New Project

Starting a new project in Android Studio is straightforward. Open Android Studio and click on "Start a new Android Studio project." You'll be prompted to choose a project template, such as an empty activity or a basic activity. After selecting a template, you'll need to configure your project by giving it a name, choosing a save location, and setting the minimum API level. Once configured, click "Finish," and Android Studio will generate the necessary files and folders for your new project.

Understanding the IDE Layout

The Android Studio interface might seem overwhelming at first, but it's designed to be intuitive. The main window is divided into several sections. The Project pane on the left shows your project's files and directories. The Editor window in the center is where you'll write your code. The Toolbar at the top provides quick access to common actions like running your app or opening the SDK Manager. At the bottom, the Logcat window displays logs and error messages, helping you debug your app. Familiarizing yourself with these components will make your development process smoother.

Running and Debugging Code

Run or Debug an App

Running or debugging your app in Android Studio is a breeze. First, make sure your app is saved and compiled. Then, click the green play button in the toolbar to run your app. If you need to debug, click the bug icon next to the play button. This will launch your app in debug mode, allowing you to set breakpoints and inspect variables. You can also choose a specific configuration to run or debug by selecting it from the dropdown menu next to the play button.

Using the Emulator

The Android Emulator is a powerful tool for testing your app without needing a physical device. To set it up, go to the AVD Manager (Android Virtual Device Manager) in the toolbar. Click "Create Virtual Device" and choose a device model and system image. Once created, you can start the emulator by clicking the play button next to your virtual device. The emulator will launch, and you can run your app on it just like you would on a real device. It's a great way to test different screen sizes and Android versions.

Deploying to a Physical Device

Deploying your app to a physical device is essential for testing real-world performance. First, enable Developer Options on your Android device by going to Settings > About Phone and tapping "Build Number" seven times. Then, enable USB Debugging in the Developer Options menu. Connect your device to your computer via USB. In Android Studio, your device should appear in the device dropdown menu. Select it and click the play button to deploy your app. This allows you to see how your app performs on actual hardware, which can be different from the emulator.

Managing App Resources

Types of Resources

Android apps use various resources to enhance functionality and user experience. These resources include:

  • Bitmaps: Images used in the app, like icons and backgrounds.
  • Layouts: XML files defining the UI structure.
  • Strings: Text values used in the app, stored in strings.xml.
  • Colors: Color values stored in colors.xml.
  • Dimensions: Size values for UI elements, stored in dimens.xml.
  • Styles: Collections of properties that define the look and feel of UI elements.

Adding Resources

Adding new resources to your project is straightforward:

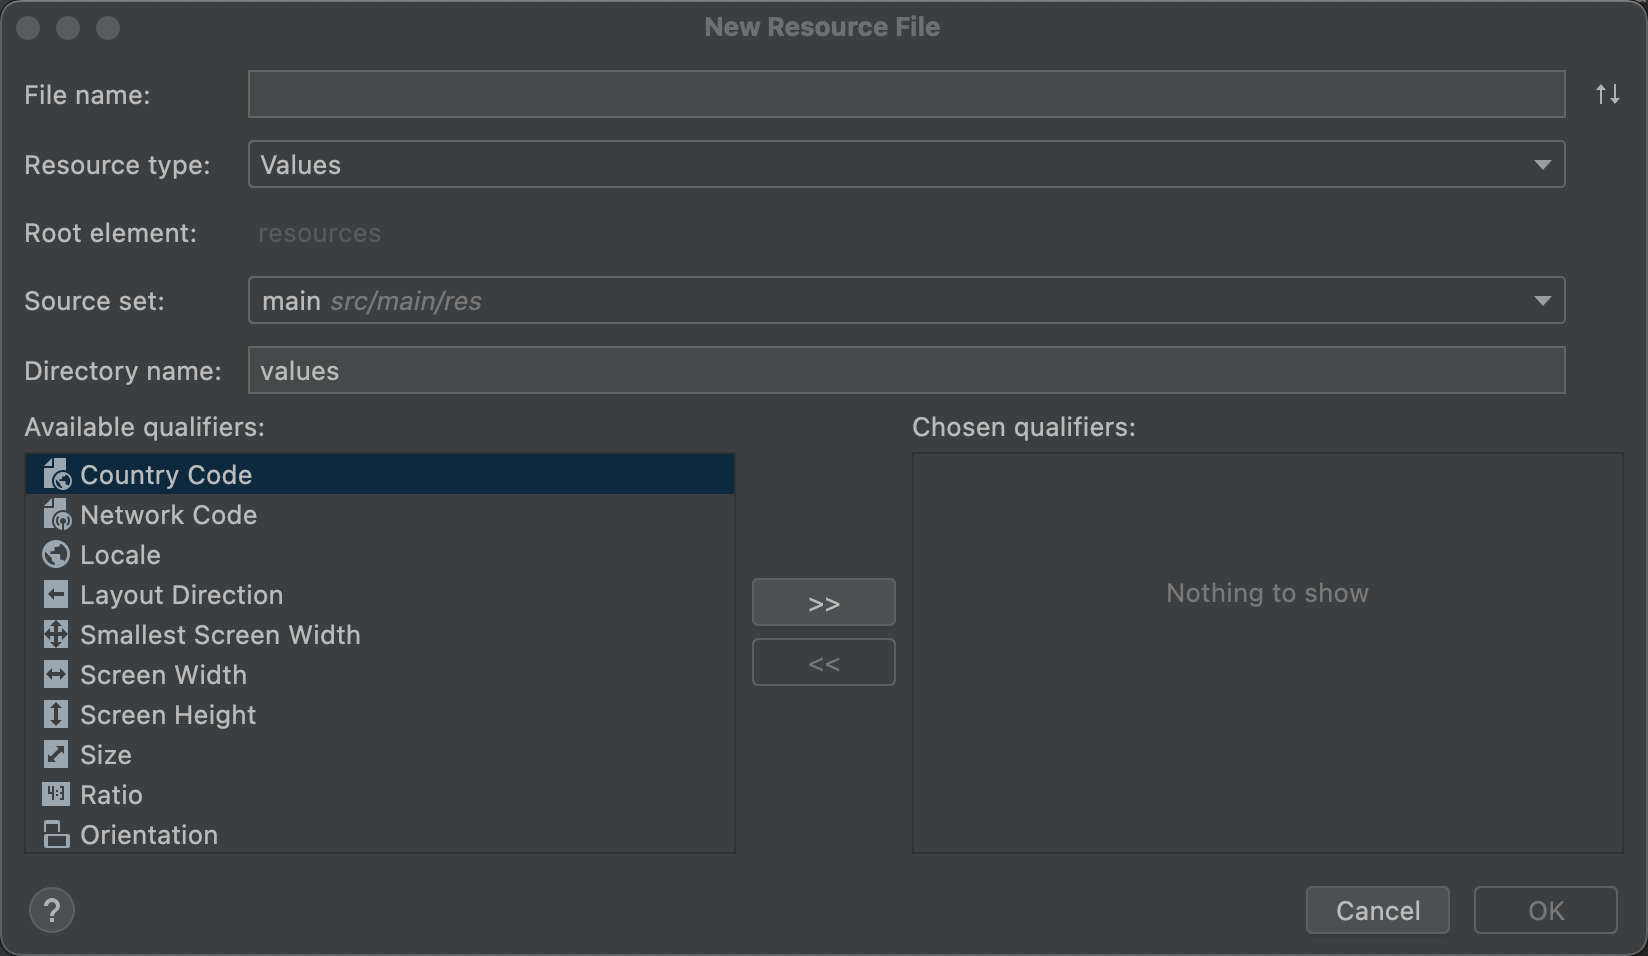
  1. Right-click the res folder in your project.
  2. Select New > Android Resource File.
  3. Choose the resource type (e.g., layout, drawable).
  4. Name your resource and click OK.

To add alternative resources for different device configurations:

  1. Right-click the res folder.
  2. Select New > Android Resource Directory.
  3. Choose the resource type and qualifier (e.g., layout-land for landscape layouts).
  4. Click OK to create the directory.

Organizing Resource Files

Keeping your resource files organized is crucial for maintaining a clean project:

  • Group similar resources: Place all images in the drawable folder, all layouts in the layout folder, etc.
  • Use meaningful names: Name resources descriptively, like activity_main.xml for the main activity layout.
  • Create subdirectories: For large projects, create subdirectories within res to further organize resources.

Accessing Resources

Access Resources in Code

Accessing resources programmatically in Kotlin or Java is simple:

  • Strings: getString(R.string.resource_name)
  • Colors: getColor(R.color.resource_name)
  • Drawables: getDrawable(R.drawable.resource_name)

Example in Kotlin:
kotlin
val myString = getString(R.string.my_string)
val myColor = ContextCompat.getColor(this, R.color.my_color)
val myDrawable = ContextCompat.getDrawable(this, R.drawable.my_drawable)

Access Resources from XML

Referencing resources in XML layout files keeps your UI consistent:

  • Strings: android:text="@string/resource_name"
  • Colors: android:background="@color/resource_name"
  • Drawables: android:src="@drawable/resource_name"

Example:
xml

Reference Style Attributes

Using style attributes helps maintain a consistent look across your app:

  1. Define styles in styles.xml:
    xml

  2. Apply styles in your XML layouts:
    xml

Providing Alternative Resources

Qualifier Name Rules

Qualifiers help provide alternative resources for different device configurations:

  • Screen size: layout-sw600dp for screens with a minimum width of 600dp.
  • Orientation: layout-land for landscape mode.
  • Density: drawable-hdpi for high-density screens.

Create Alias Resources

Alias resources point to other resources, simplifying management:

  1. Create an alias in res/values/aliases.xml:
    xml
    @drawable/icon_hdpi

  2. Use the alias in your layouts:
    xml

Best Practices for Device Compatibility

Ensure your app works well on different devices:

  • Provide multiple layouts: Use qualifiers to create layouts for different screen sizes and orientations.
  • Use scalable images: Provide images in various resolutions (mdpi, hdpi, xhdpi, etc.).
  • Test on multiple devices: Use emulators and physical devices to test your app's compatibility.

Advanced Resource Management

Resource Merging

Resource merging happens when multiple resource files from different sources combine into a single resource set. This process is essential when using libraries or modules that include their own resources. Sometimes, conflicts arise if two resources share the same name. To handle these conflicts, you can use tools like the tools:replace attribute in your XML files. This attribute tells the build system which resource to keep when merging.

Inline Complex XML Resources

Inlining complex XML resources can make your app run faster. Instead of referencing external XML files, you can place the XML content directly within your layout files. This reduces the number of files the system needs to read, speeding up the rendering process. For example, instead of referencing a separate drawable XML file for a shape, you can define the shape directly within your layout XML.

Change Your Resource Directory

Sometimes, you might need to change the default resource directory. This can happen if you have a large project with many resources, and you want to organize them better. To change the resource directory, you need to update the sourceSets block in your build.gradle file. Specify the new directory path, and Android Studio will use it for your resources.

Troubleshooting and Optimization

Common Issues and Fixes

Resource-related issues can be tricky. Common problems include missing resources, incorrect resource references, and resource conflicts. To fix these issues, double-check your resource names and paths. Use the R class to ensure your resources are correctly referenced in your code. If a resource is missing, make sure it’s in the correct directory and properly named.

Optimize Resource Usage

Optimizing resource usage can significantly improve your app's performance. Use vector drawables instead of bitmaps for scalable images. Compress your images to reduce their size. Remove unused resources to keep your app lightweight. Also, consider using resource qualifiers to provide optimized resources for different screen sizes and densities.

Access Original Files

Sometimes, you need to access and modify the original resource files. This can be useful for debugging or making quick changes. Navigate to the res directory in your project’s file explorer. Here, you can find all your resource files, such as layouts, drawables, and strings. Open these files with a text editor to make your changes.

Additional Tools and Features

Using Lint for Resource Management

Lint is a powerful tool that helps identify and fix resource-related issues. It scans your project for potential problems, such as unused resources, missing translations, and incorrect references. Run Lint from the Android Studio menu or use the command line to generate a detailed report. Fix the issues Lint identifies to keep your project clean and efficient.

Integrating Third-Party Libraries

Third-party libraries can enhance your app's functionality. To integrate a library, add its dependency to your build.gradle file. Sync your project, and Android Studio will download and include the library in your build. Make sure to check the library's documentation for any additional setup steps or resource requirements.

Using Android Jetpack

Android Jetpack is a suite of libraries that help manage resources and other aspects of app development. Components like ViewModel and LiveData help manage UI-related data in a lifecycle-conscious way. DataBinding allows you to bind UI components directly to data sources, reducing boilerplate code. Explore Jetpack components to streamline your resource management and improve your app's architecture.

Wrapping It Up

All in all, Android Studio offers a robust platform for building Android apps, from writing code to resource management. Mastering resource handling not only keeps your app organized but also ensures it runs smoothly across various devices. Understanding the IDE, running and debugging, and effectively using resources like layouts, strings, and drawables will make your development journey less bumpy. Remember to keep resource files tidy and test thoroughly on both emulators and physical devices. With these practices, you'll be well on your way to creating fantastic mobile applications that stand out in the crowded app market.

Feature Overview

This feature simplifies app development by offering a comprehensive suite of tools. It includes a code editor, emulator, and debugger. The code editor supports multiple languages, auto-completion, and syntax highlighting. The emulator lets developers test apps on virtual devices, mimicking real-world conditions. The debugger helps identify and fix issues quickly. Additionally, it integrates with version control systems like Git, ensuring smooth collaboration.

Compatibility and Requirements

To ensure your device supports the feature, check these requirements and compatibility details:

  1. Operating System: Your device must run on Android 8.0 (Oreo) or later. Older versions won't support the feature.
  2. RAM: At least 2GB of RAM is necessary. Devices with less memory might experience performance issues.
  3. Storage: Ensure you have at least 500MB of free storage. This space is needed for installation and smooth operation.
  4. Processor: A Quad-core processor or better is recommended. Slower processors may struggle with the feature.
  5. Screen Resolution: A minimum resolution of 720p (1280x720 pixels) is required. Lower resolutions might not display the feature correctly.
  6. Bluetooth: If the feature involves connectivity, your device should support Bluetooth 4.0 or higher.
  7. Internet Connection: A stable Wi-Fi or 4G connection is essential for features requiring online access.
  8. Permissions: Ensure your device allows necessary permissions like location, camera, and microphone access.

Check these details in your device settings to confirm compatibility. If your device meets these requirements, you should be good to go!

Setting Up

  1. Download Android Studio from the official website.
  2. Install the downloaded file by following the on-screen instructions.
  3. Launch Android Studio once installation completes.
  4. Select "Start a new Android Studio project" on the welcome screen.
  5. Choose a project template like "Empty Activity" and click "Next."
  6. Configure your project by naming it, choosing a save location, and setting the language (Java/Kotlin).
  7. Set the minimum API level required for your app.
  8. Click "Finish" to create your project.
  9. Wait for Gradle to build your project.
  10. Connect your Android device via USB or start an emulator.
  11. Enable Developer Options and USB Debugging on your Android device.
  12. Run your project by clicking the green play button in Android Studio.
  13. Select your device or emulator from the list.
  14. Wait for the app to install and launch on your device.

Done! Your app should now be running on your device or emulator.

Effective Usage Tips

Organize your project files into folders like "layouts," "drawables," and "values." This keeps everything tidy.

Use shortcuts like Ctrl+Shift+O to optimize imports. It saves time and keeps code clean.

Refactor code with Ctrl+Alt+Shift+T. This helps rename variables, extract methods, and more without breaking anything.

Debug efficiently by setting breakpoints with Ctrl+F8. Inspect variables and step through code to find issues.

Emulate different devices using the AVD Manager. Test how your app looks and performs on various screen sizes and resolutions.

Use the Layout Inspector to see a hierarchical view of your UI. This helps identify layout issues quickly.

Enable Instant Run for faster builds. It pushes code changes to your running app without a full rebuild.

Monitor performance with Android Profiler. Check CPU, memory, and network usage to optimize your app.

Keep your SDK and plugins up to date. This ensures compatibility and access to new features.

Leverage Gradle for build automation. Customize build scripts to manage dependencies and create different build variants.

Utilize Lint to catch potential bugs and improve code quality. It provides suggestions for best practices and optimizations.

Write unit tests using JUnit and Espresso for UI tests. This ensures your app works as expected and reduces bugs.

Explore the Android Jetpack libraries. They offer components like LiveData, ViewModel, and Navigation to simplify development.

Document your code with comments and Javadoc. This makes it easier for others (and future you) to understand your logic.

Collaborate with version control systems like Git. Track changes, work on branches, and merge code seamlessly.

Stay updated with the latest Android development trends. Follow blogs, attend webinars, and join developer communities.

Issues and Solutions

Battery draining too fast? Close unused apps, lower screen brightness, and turn off Wi-Fi or Bluetooth when not needed.

Phone overheating? Avoid using it while charging, close background apps, and keep it out of direct sunlight.

Slow performance? Clear cache, uninstall unused apps, and restart the device.

Apps crashing? Update the app, clear its cache, or reinstall it.

Connectivity issues? Toggle airplane mode on and off, restart the device, or reset network settings.

Storage full? Delete unnecessary files, move data to an SD card, or use cloud storage.

Screen unresponsive? Restart the device, remove any screen protector, or check for software updates.

Can't receive calls? Ensure Do Not Disturb is off, check signal strength, or reset network settings.

Bluetooth not pairing? Turn Bluetooth off and on, restart both devices, or forget and re-pair the device.

Camera not working? Restart the phone, clear the camera app's cache, or check for software updates.

Privacy and Security

Using this feature, user data gets handled with care. The app encrypts information, ensuring safety during transmission. To maintain privacy, always update your device and apps. Avoid using public Wi-Fi for sensitive tasks. Enable two-factor authentication for an extra layer of security. Regularly review app permissions and only grant necessary ones. Be cautious of phishing attempts and never share personal information with untrusted sources.

Comparing Alternatives

Pros of Android Studio:

  • Customization: Offers extensive customization options for developers.
  • Integration: Seamlessly integrates with other Google services.
  • Open Source: Free to use and modify, making it accessible.
  • Community Support: Large community for troubleshooting and advice.

Cons of Android Studio:

  • Resource Intensive: Requires significant system resources to run smoothly.
  • Complexity: Steeper learning curve for beginners.
  • Performance: Can be slower compared to other IDEs.

Alternatives:

Xcode (for iOS Development):

  • Pros: Optimized for Apple devices, user-friendly interface, strong performance.
  • Cons: Limited to macOS, less flexibility in customization.

Visual Studio Code:

  • Pros: Lightweight, supports multiple programming languages, extensive plugins.
  • Cons: Requires additional setup for mobile development, less specialized for Android.

IntelliJ IDEA:

  • Pros: Robust features, excellent code analysis, supports multiple languages.
  • Cons: Paid version needed for full features, can be complex for new users.

Eclipse:

  • Pros: Highly customizable, supports various programming languages, strong plugin ecosystem.
  • Cons: Outdated interface, can be slow, less specialized for Android development.

Battery draining too fast? Close unused apps, lower screen brightness, and turn off Wi-Fi or Bluetooth when not needed.

Phone overheating? Avoid using it while charging, close background apps, and keep it out of direct sunlight.

Slow performance? Clear cache, uninstall unused apps, and restart the device.

Apps crashing? Update the app, clear its cache, or reinstall it.

Connectivity issues? Toggle airplane mode on and off, restart the device, or reset network settings.

Storage full? Delete unnecessary files, move data to an SD card, or use cloud storage.

Screen unresponsive? Restart the device, remove any screen protector, or check for software updates.

Can't receive calls? Ensure Do Not Disturb is off, check signal strength, or reset network settings.

Bluetooth not pairing? Turn Bluetooth off and on, restart both devices, or forget and re-pair the device.

Camera not working? Restart the phone, clear the camera app's cache, or check for software updates.

Final Thoughts

Android Studio Code is a powerful tool for developers. It offers a range of features like code completion, real-time error detection, and integrated testing. These tools help streamline the development process, making it easier to create high-quality apps. The user-friendly interface and extensive documentation make it accessible for both beginners and experienced developers. Regular updates ensure it stays current with the latest Android trends. By mastering Android Studio Code, developers can improve their productivity and create more efficient, reliable applications. Whether you're building a simple app or a complex project, this tool provides the resources needed to succeed. Dive in, explore its features, and start building your next Android masterpiece.

How do you run code in Android Studio?

Select the run/debug configuration from the drop-down list in the toolbar. Then, click Run or Debug.

What are resources in Android Studio?

Resources are files and static content like bitmaps, layout definitions, UI strings, and animation instructions. They help keep your code clean and maintainable.

Can I use Android Studio for other programming languages?

Primarily, Android Studio is for Java and Kotlin. However, with plugins, you can use other languages like C++.

How do you add a new resource file in Android Studio?

Right-click the res folder, select New, then choose the type of resource file you need, like Layout Resource File or Drawable Resource File.

What is the purpose of Gradle in Android Studio?

Gradle automates building, testing, and deploying your app. It manages dependencies and ensures your project is built correctly.

How do you debug an app in Android Studio?

Set breakpoints in your code, then select Debug from the toolbar. Use the Debugger window to inspect variables and control execution flow.

What is an APK in Android Studio?

An APK (Android Package) is the file format for Android apps. It contains all the app's code, resources, and metadata.

Was this page helpful?