
Introduction
The Android Emulator is a powerful tool for developers, allowing them to test and debug applications on various Android versions and devices without needing physical hardware. However, running the Android Emulator can be resource-intensive, especially with complex applications or high-performance requirements. This is where the Intel Hardware Accelerated Execution Manager (HAXM) comes into play. HAXM is a hardware-assisted virtualization engine that uses Intel Virtualization Technology (VT) to speed up the Android development process by offloading CPU instructions to the host processor.
This article explores HAXM drivers, covering installation, configuration, and troubleshooting. It also discusses the latest developments, including the replacement of HAXM with the Android Emulator Hypervisor Driver (AEHD).
What is HAXM?
HAXM is a software component developed by Intel to enhance the performance of the Android Emulator. It leverages Intel VT-x, Intel EM64T, and Execute Disable (XD) Bit functionality to execute most CPU instructions natively through the host processor. This approach significantly reduces the overhead associated with traditional software-based virtualization, resulting in faster execution times and improved overall performance.
System Requirements
To install and use HAXM, systems must meet specific hardware and software requirements:
-
Hardware Requirements:
- An Intel processor with support for Intel VT-x, Intel EM64T (Intel 64), and Execute Disable (XD) Bit functionality
- At least 4 GB of available RAM; 8 GB is recommended
-
Supported Operating Systems:
- Microsoft Windows 10 64-bit
- Microsoft Windows 8 and 8.1 64-bit
- Microsoft Windows 7 64-bit (with specific security updates)
Installation Instructions
HAXM can be installed either through the Android SDK Manager or manually by downloading the installer from Intel’s website.
Using the Android SDK Manager
-
Open Android Studio:
- Launch Android Studio and navigate to the SDK Manager
- In the SDK Tools tab, look for "Intel x86 Emulator Accelerator (HAXM installer)"
- Check the box next to it and click Apply
-
Install HAXM:
- The SDK Manager will download and install HAXM automatically
Manual Installation
-
Download HAXM Installer:
- Visit Intel’s website and download the latest version of HAXM
- Save the installer file (usually named
haxm.exe) to a directory on your system
-
Run the Installer:
- Double-click the
haxm.exefile to launch the installer - Follow the on-screen instructions to complete the installation process
- Double-click the
Troubleshooting Common Issues
Despite its powerful capabilities, HAXM can sometimes encounter issues during installation or operation. Here are some common problems and their solutions:
VT-x Not Enabled
One of the most common issues is that HAXM reports VT-x is not enabled, even though it has been clearly enabled in the BIOS. This can occur due to several reasons:
-
BIOS Settings:
- Ensure that VT-x is enabled in the BIOS settings. This setting is often found under the "Advanced" or "Security" section of the BIOS menu
- Save the changes and reboot your system
-
HAXM Check Tool:
- Run the HAXM Check tool to verify that VT-x is recognized by your system
- If the tool still reports that VT-x is not enabled, check for any firmware updates for your motherboard
-
Secure Boot Issues:
- On non-upgraded fresh installations of Windows 10 with Secure Boot ON, drivers must be signed by Microsoft or with an end-entity certificate issued prior to July 29th, 2015 that chains to a supported cross-signed CA
- Disable Secure Boot as a workaround, but be aware that this may introduce security risks
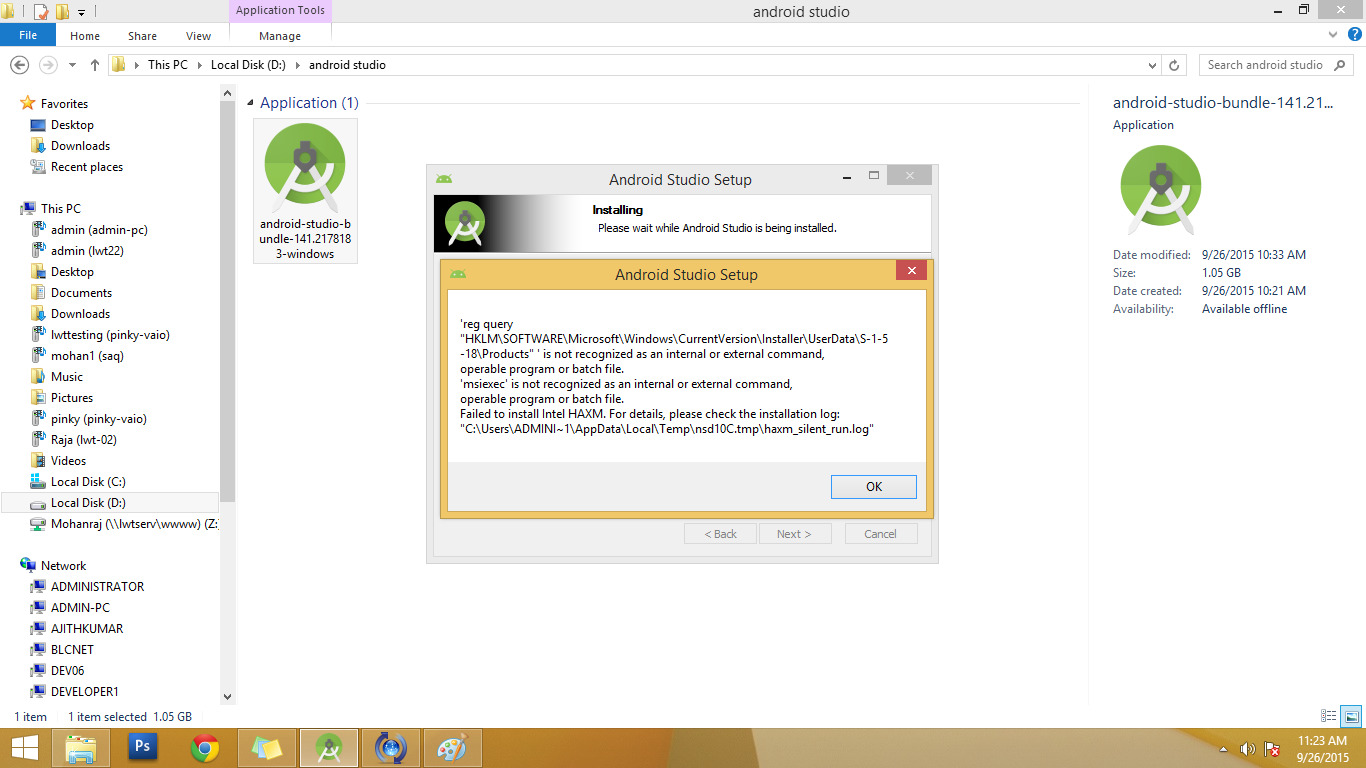
Installation Errors
If you encounter errors during the installation process, here are some steps you can take:
-
Disable Antivirus Software:
- Temporarily disable any antivirus software that might be interfering with the installation process
- Extract the contents of the archive and then extract the contents of the file
intelhaxm-android.exeusing a tool like 7Zip
-
Check Event Viewer:
- Look for error messages in the Event Viewer that might provide clues about what went wrong
- The error code 2755 with arguments 110 and R:\Temp\Intel\HAXM\6.0.4\2020-01-22_19-18-20\hax64.msi indicates an issue with the MSI installer
-
Run Setup Manually:
- Extract the contents of the archive and run
setup.exemanually from the extracted folder - This approach can bypass any issues related to the MSI installer
- Extract the contents of the archive and run
Driver Installation Issues
Sometimes, the HAXM driver may not install correctly, leading to errors like "Failed to configure driver: unknown error" or "Failed to open driver".
-
Check Driver Signatures:
- Ensure that the HAXM driver is signed correctly. On Windows 10, unsigned drivers may be blocked by the operating system
- Look for updates from Intel or try disabling Secure Boot as mentioned earlier
-
Disable Hyper-V:
- Hyper-V, Sandbox, Windows Hypervisor Platform (WHPX), and Windows Subsystem for Linux 2 (WSL2) can conflict with HAXM
- Disable Hyper-V by running
bcdedit /set hypervisorlaunchtype offin an elevated Command Prompt and then rebooting your machine
Uninstalling HAXM
If you need to uninstall HAXM for any reason, here are the steps to follow:
Using SDK Manager
- Open SDK Manager:
- Launch Android Studio and navigate to the SDK Manager
- In the SDK Tools tab, locate "Intel x86 Emulator Accelerator (HAXM installer)" and clear the checkbox
- Click Apply and follow the prompts to uninstall HAXM
Using Windows Settings
- Open Settings:
- Navigate to Apps > Installed apps in Windows settings
- Locate "Intel Hardware Accelerated Execution Manager" and click Uninstall
- The uninstaller should run and report the result
Using Command Line
-
Stop HAXM Service:
- Run
sc stop intelhaxmin Command Prompt to stop the HAXM service - You should see output indicating that the service has been stopped
- Run
-
Delete HAXM Service:
- Run
sc delete intelhaxmto delete the HAXM service - You should see output indicating that the service has been deleted
- Run
-
Delete Installer Package:
- Locate the HAXM installer package at
<Your Android SDK folder>\extras\intel - Delete this package to ensure that the SDK manager does not list HAXM as installed
- Locate the HAXM installer package at
Replacement with AEHD
Starting from emulator version 33.x.x.x, Intel has deprecated HAXM in favor of the Android Emulator Hypervisor Driver (AEHD). AEHD is designed to replace HAXM on Intel processors and provides similar functionality with improved compatibility and security features.
Installing AEHD
To install AEHD, follow these steps:
-
Check System Requirements:
- Ensure your system meets the requirements for AEHD, including an Intel or AMD processor with virtualization extensions
-
Download AEHD:
- Visit the Android developer website to download the latest version of AEHD
-
Install AEHD:
- Follow the on-screen instructions to complete the installation process
-
Configure VM Acceleration:
- Before you can use AEHD, you must configure VM acceleration
- Run
sc query aeihdin Command Prompt to check if AEHD is installed and running - If not, start it using
sc start aeihd
Tips and Tricks
To get the best experience out of the Android emulator using HAXM or AEHD, here are some recommendations:
Enable GPU Acceleration
-
AVD Manager:
- Enable GPU acceleration in the AVD Manager for your image
- This offloads OpenGL calls to the host GPU, significantly improving performance
-
Set Environment Variables:
- Ensure that the "ANDROID_SDK_ROOT" environment variable is set either in Control Panel > System > Advanced System Settings > Environment Variables or manually each time a new command prompt is launched
- The
<sdk install location>typically refers toc:\Users\<your username>\AppData\Local\Android\sdk
-
Verbose Output:
- Launch the emulator from the command line to get more verbose output
- Use the following command:
%ANDROID_SDK_ROOT%\tools\emulator –avd <avd_name> -verbose –show-kernel
-
Disable Hyper-V:
- On Windows 10 build 1903 or higher versions, disable Hyper-V as it conflicts with HAXM and AEHD
- Open an elevated Command Prompt and run
bcdedit /set hypervisorlaunchtype off - Reboot your machine after making these changes
-
Antivirus Interference:
- Avast Antivirus may interfere with HAXM and cause the Android Emulator or QEMU to run very slowly
- Uncheck "Use nested virtualization where available" in Avast Settings > Troubleshooting