Android Apps on Windows 11: The Complete Guide

Android Emulator
android-apps-on-windows-11-the-complete-guide
Source: Tomshardware.com

Introduction to Android Apps on Windows 11

Overview

Running Android apps on Windows 11 is a game-changer. It means you can use your favorite mobile apps directly on your computer. This feature is made possible through the Windows Subsystem for Android, which creates a bridge between the two platforms.

Benefits

There are several perks to using Android apps on a Windows 11 device. For starters, you get access to a vast library of apps that might not have a Windows counterpart. This can be especially useful for productivity apps, games, or social media. Plus, you can enjoy the convenience of a larger screen, better performance, and the ability to use a keyboard and mouse.

Key Takeaways:

  • Running Android apps on Windows 11 lets you enjoy your favorite mobile games and tools on a bigger screen with a keyboard and mouse, thanks to the Windows Subsystem for Android.
  • If an app isn't available in the Amazon Appstore, you can use emulators like BlueStacks or install APK files to get it running on your Windows 11 computer.

System Requirements

Minimum Requirements

To run Android apps on Windows 11, your system needs to meet certain criteria. Here’s a quick rundown:

  • Operating System: Windows 11
  • Processor: Intel Core i3 8th Gen, AMD Ryzen 3000, or Qualcomm Snapdragon 8c
  • RAM: At least 8 GB
  • Storage: SSD with at least 64 GB free space
  • Virtualization: Enabled in BIOS/UEFI
  • Microsoft Store: Latest version

Check System Compatibility

Before diving in, you need to ensure your system meets these requirements. Here’s how:

  1. Open Settings: Click on the Start menu, then the gear icon.
  2. Go to System: Select 'About' to check your processor and RAM.
  3. Storage Check: Navigate to 'System' > 'Storage' to see available space.
  4. Virtualization: Restart your PC, enter BIOS/UEFI settings (usually by pressing F2, F10, or DEL during startup), and ensure virtualization is enabled.

Setting Up Windows Subsystem for Android

Enable Virtualization

Virtualization is crucial for running Android apps. Here’s how to enable it:

  1. Restart Your PC: During startup, press the key to enter BIOS/UEFI settings.
  2. Find Virtualization Settings: Look for options like 'Intel VT-x', 'AMD-V', or 'SVM'.
  3. Enable It: Toggle the setting to 'Enabled'.
  4. Save and Exit: Save changes and exit BIOS/UEFI.

Install Windows Subsystem for Android

Now, let’s get the Windows Subsystem for Android up and running:

  1. Open Microsoft Store: Search for 'Windows Subsystem for Android'.
  2. Download and Install: Click 'Get' and follow the prompts.
  3. Install Amazon Appstore: This will also install the Amazon Appstore, which is needed for downloading Android apps.

Update Windows and Microsoft Store

To ensure everything runs smoothly, keep your system updated:

  1. Update Windows: Go to 'Settings' > 'Update & Security' > 'Windows Update' and check for updates.
  2. Update Microsoft Store: Open the Store, click on the three dots in the top-right corner, select 'Downloads and updates', then 'Get updates'.

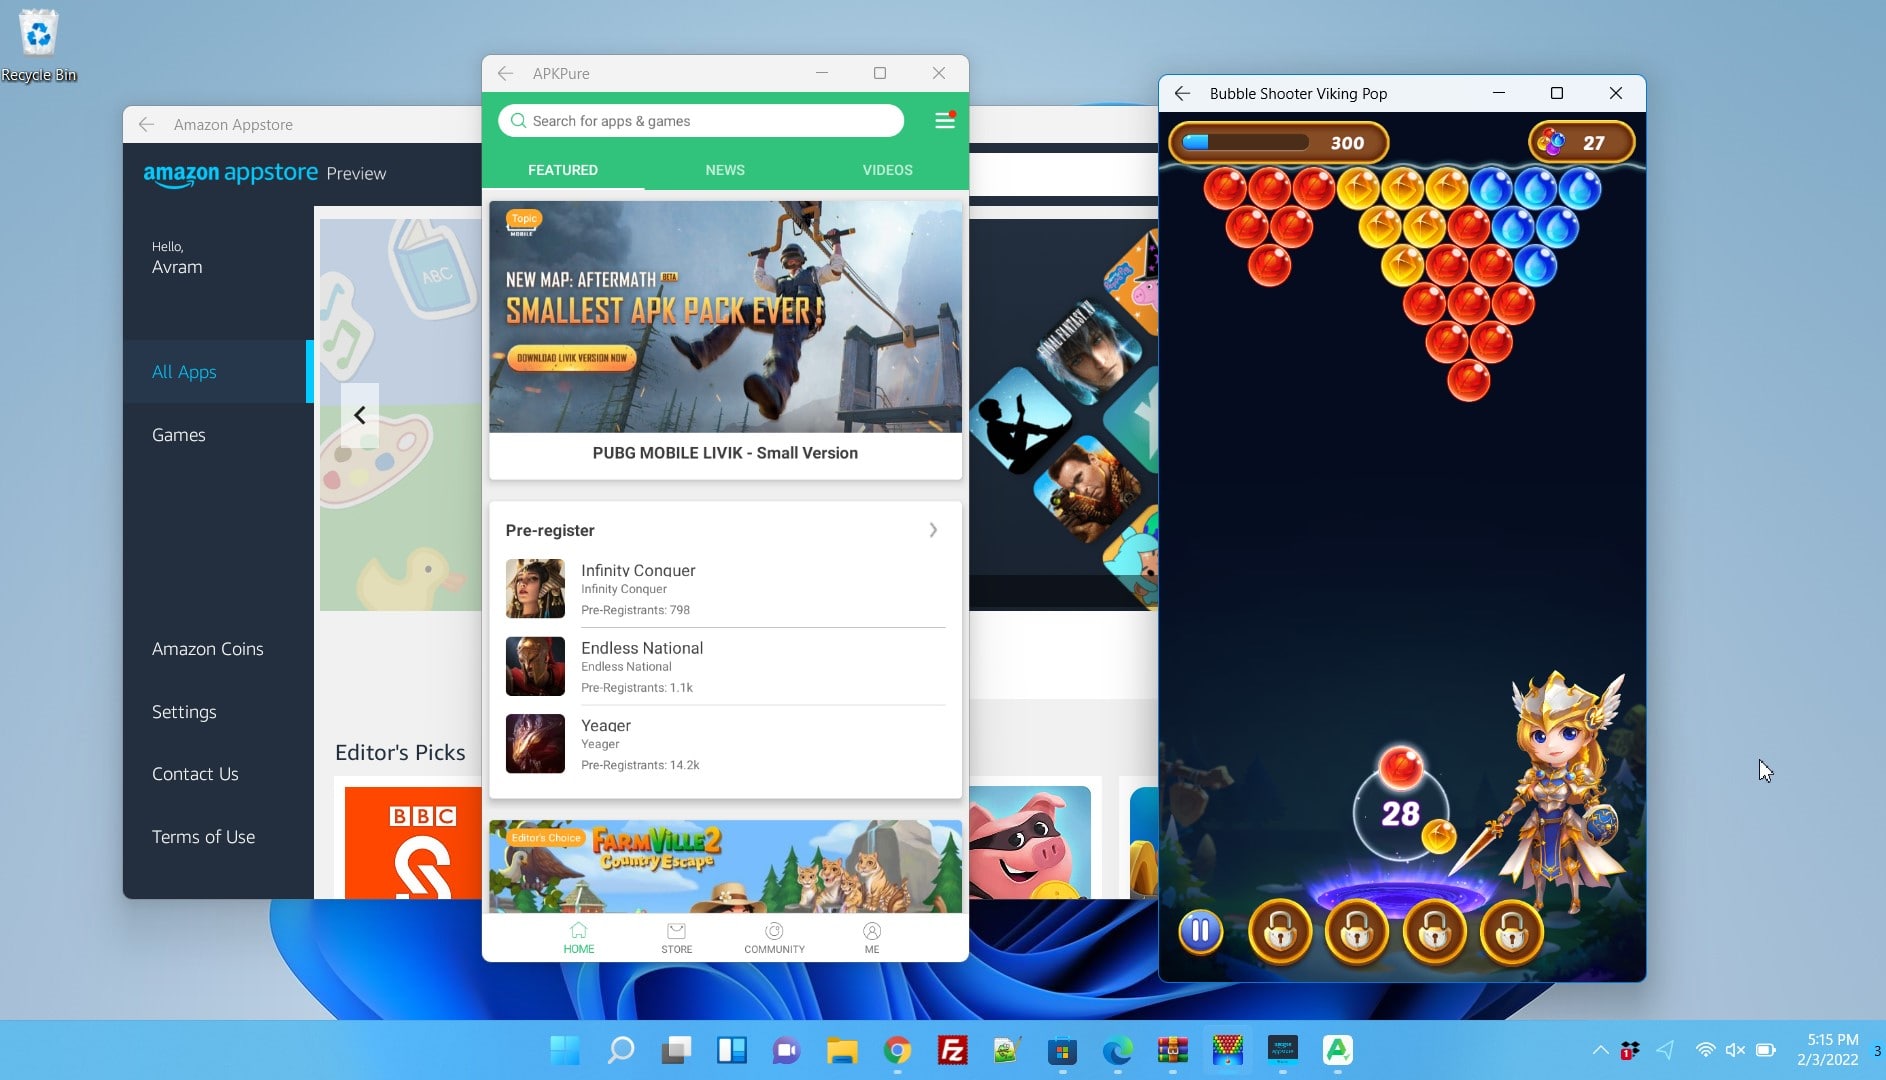
Installing Android Apps via Amazon Appstore

Install Amazon Appstore

First things first, you need to get the Amazon Appstore on your Windows 11 device. Here’s how:

  1. Open the Microsoft Store on your computer.
  2. In the search bar, type "Amazon Appstore" and press Enter.
  3. Click on the Amazon Appstore from the search results.
  4. Hit the Install button and wait for the download to complete.
  5. Once installed, open the Amazon Appstore from the Start menu.

Sign In and Browse

Now that you’ve got the Amazon Appstore installed, it’s time to sign in and start exploring:

  1. Open the Amazon Appstore.
  2. You’ll be prompted to sign in. Use your Amazon account credentials.
  3. After signing in, you can browse through the categories or use the search bar to find specific apps.

Download and Install Apps

Found an app you like? Here’s how to get it on your device:

  1. Click on the app you want to install.
  2. Press the Get button.
  3. The app will start downloading and automatically install once the download is complete.
  4. You can find the installed app in your Start menu or on your desktop.

Running Android Apps on Windows 11

Launching Apps

Launching your newly installed Android apps is a breeze:

  1. Open the Start menu.
  2. Scroll through the list of apps or use the search bar to find the app you installed.
  3. Click on the app icon to launch it.

Using Apps

Here are some tips to make the most out of your Android apps on Windows 11:

  • Full-Screen Mode: Most apps can be maximized to full screen by clicking the maximize button in the top-right corner.
  • Keyboard Shortcuts: Use familiar Windows keyboard shortcuts for copy, paste, and other functions.
  • Touchscreen Support: If your device has a touchscreen, you can interact with apps just like you would on a tablet.

Managing App Settings

To tweak settings for your installed Android apps:

  1. Open the Settings app from the Start menu.
  2. Navigate to Apps > Apps & features.
  3. Find the app you want to adjust and click on it.
  4. Select Advanced options to access various settings like permissions, storage, and notifications.

Uninstalling Android Apps

Remove Apps from Start Menu

If you no longer need an app, here’s how to remove it directly from the Start menu:

  1. Open the Start menu.
  2. Find the app you want to uninstall.
  3. Right-click on the app icon and select Uninstall.
  4. Confirm the uninstallation when prompted.

Uninstall via Settings

Another way to uninstall apps is through the Settings menu:

  1. Open the Settings app.
  2. Go to Apps > Apps & features.
  3. Scroll through the list to find the app you want to remove.
  4. Click on the app and select Uninstall.
  5. Follow the on-screen instructions to complete the process.

Alternative Methods to Run Android Apps

Using Emulators

When it comes to running Android apps on Windows 11, using an emulator is a popular choice. Emulators like BlueStacks mimic an Android device on your computer, allowing you to run apps just like you would on a phone or tablet. BlueStacks is one of the most well-known options because it’s user-friendly and supports a wide range of apps.

To get started, download BlueStacks from its official website. After installation, open BlueStacks and sign in with your Google account. This will give you access to the Google Play Store, where you can download and install Android apps directly onto the emulator. BlueStacks also offers features like keyboard mapping and multi-instance, which can enhance your experience.

Installing APK Files

Another way to run Android apps on Windows 11 is by sideloading APK files. APK files are the installation files for Android apps. This method is useful if the app you want isn’t available on the Amazon Appstore or Google Play Store.

First, download the APK file from a trusted source. Next, open the Windows Subsystem for Android settings and enable developer mode. This will allow you to install apps from outside the official app stores. Then, use a file manager to locate the APK file on your computer and double-click it to start the installation process. Once installed, you can launch the app from the Start menu or desktop.

Troubleshooting Common Issues

App Compatibility Issues

Sometimes, you might run into compatibility issues with certain Android apps on Windows 11. If an app isn’t working correctly, check if there’s an update available for either the app or the Windows Subsystem for Android. Updating can often resolve compatibility problems.

If updating doesn’t help, try running the app in compatibility mode. Right-click the app icon, select Properties, and navigate to the Compatibility tab. Here, you can choose to run the app in a mode that mimics an earlier version of Windows, which might solve the issue.

Performance Optimization

To get the best performance out of your Android apps, make sure your system meets the minimum requirements and that virtualization is enabled. Close any unnecessary programs running in the background to free up system resources. You can also adjust the performance settings in the Windows Subsystem for Android settings menu to allocate more resources to the apps.

Debugging and Developer Mode

For those who like to tinker, enabling developer mode can be quite useful. This mode allows you to access advanced settings and tools for debugging apps. To enable developer mode, go to the Windows Subsystem for Android settings and toggle the developer mode switch. You can then use tools like ADB (Android Debug Bridge) to debug and test apps, which is especially helpful for developers.

Advanced Features and Settings

Multi-Instance Feature

One cool feature of some emulators and the Windows Subsystem for Android is the ability to run multiple instances of Android apps simultaneously. This means you can have more than one app open at the same time, just like you would on a multi-tasking mobile device. This feature is great for productivity, allowing you to switch between apps without closing them.

Input Compatibility

Using Android apps on a Windows 11 device means you’ll likely use a keyboard and mouse instead of a touchscreen. Most apps are compatible with these inputs, but some might require touch input for the best experience. If you have a touchscreen laptop or tablet, you can use touch gestures just like on an Android device. For apps that rely heavily on touch, consider using an emulator that supports touch input.

Window Management

Managing app windows efficiently can make your experience smoother. You can resize and move Android app windows just like any other window on Windows 11. This flexibility allows you to arrange your workspace to suit your needs. Some emulators also offer features like window snapping and multi-window support, which can further enhance your productivity.

Final Thoughts on Android Apps on Windows 11

Bringing Android apps to Windows 11 merges the best of both worlds, offering a seamless experience and expanding your device's capabilities. From enhanced productivity to more gaming options, this integration opens up countless possibilities. By using the Windows Subsystem for Android, emulators like BlueStacks, or sideloading APK files, you can enjoy your favorite mobile apps on a larger screen with a keyboard and mouse. While occasional hiccups with compatibility or performance may arise, tweaks and updates usually resolve them. Dive in and explore this exciting fusion of mobile and desktop ecosystems!

Understanding Android Apps on Windows 11

This feature enables users to run Android apps directly on Windows 11. It integrates the Amazon Appstore with the Microsoft Store, allowing seamless access to a variety of Android applications. Users can download, install, and use these apps just like any other Windows application. This bridges the gap between mobile and desktop experiences, providing enhanced flexibility and productivity.

What You Need to Run Android Apps on Windows 11

To run Android apps on Windows 11, your device must meet specific requirements. First, ensure your system has Windows 11 installed. Your PC should have at least 8GB of RAM, but 16GB is recommended for better performance. The processor must be an Intel Core i3 8th Gen, AMD Ryzen 3000, or Qualcomm Snapdragon 8c or better.

Your device needs to support Hyper-V and Virtual Machine Platform. To check, go to Control Panel > Programs > Turn Windows features on or off and ensure both options are enabled. Additionally, your system should have SSD storage for faster app loading times.

Make sure your Microsoft Store is updated to the latest version. You also need an Amazon account to access the Amazon Appstore, which is where you'll download Android apps. Your region must be set to the United States in Settings > Time & Language > Language & Region.

Lastly, ensure your graphics driver is up-to-date. Visit the manufacturer's website for the latest drivers. Meeting these requirements will ensure your device can run Android apps smoothly on Windows 11.

How to Set Up Android Apps on Windows 11

  1. Update Windows 11: Ensure your system is up-to-date. Go to Settings > Windows Update and click Check for updates.

  2. Enable Virtualization: Open Task Manager by pressing Ctrl + Shift + Esc. Go to the Performance tab and check if Virtualization is enabled. If not, restart your computer, enter the BIOS/UEFI settings, and enable it.

  3. Install Amazon Appstore: Open the Microsoft Store and search for Amazon Appstore. Click Install and follow the on-screen instructions.

  4. Set Up Amazon Appstore: Once installed, open the Amazon Appstore from the Start menu. Sign in with your Amazon account or create a new one.

  5. Install Windows Subsystem for Android: During the Amazon Appstore setup, the Windows Subsystem for Android will automatically install. Follow the prompts to complete the installation.

  6. Browse and Install Android Apps: Open the Amazon Appstore and browse for Android apps. Click Get to download and install your desired apps.

  7. Launch Android Apps: Find installed apps in the Start menu. Click to open and use them just like any other Windows application.

  8. Adjust Settings: Open Windows Subsystem for Android Settings from the Start menu to tweak performance, manage storage, or enable developer mode if needed.

Tips for Using Android Apps on Windows 11

Install Amazon Appstore: First, get the Amazon Appstore from the Microsoft Store. This will let you download Android apps directly onto your Windows 11 device.

Enable Virtualization: Make sure virtualization is enabled in your BIOS settings. This helps your computer run Android apps smoothly.

Use Windows Subsystem for Android (WSA): WSA allows Android apps to run natively on Windows. Check if your system meets the requirements and install it.

Pin Apps to Taskbar: For quick access, pin your favorite Android apps to the taskbar. Right-click the app and select "Pin to taskbar."

Use Snap Layouts: Organize your workspace by using Snap Layouts. Drag your Android app to the top of the screen to choose a layout.

Keyboard Shortcuts: Learn keyboard shortcuts for Android apps. For example, use Ctrl + C to copy and Ctrl + V to paste.

Sync Notifications: Sync notifications between your Android phone and Windows 11. Use the Your Phone app to keep track of messages and alerts.

Adjust App Permissions: Go to Settings > Apps > Apps & features. Find your Android app and adjust permissions like location, camera, and microphone.

Update Regularly: Keep both Windows 11 and your Android apps updated. This ensures you get the latest features and security patches.

Backup Data: Regularly back up your data. Use cloud services like Google Drive or OneDrive to keep your files safe.

Use a Stylus: If you have a touchscreen device, use a stylus for better precision in drawing or note-taking apps.

Optimize Battery Usage: Monitor battery usage by going to Settings > System > Power & battery. Adjust settings to extend battery life while using Android apps.

Check Compatibility: Not all Android apps work perfectly on Windows 11. Check reviews and forums to see if others have faced issues with specific apps.

Use a VPN: For apps that require a specific location, use a VPN. This can help you access region-locked content.

Customize Notifications: Go to Settings > System > Notifications. Customize how and when you receive notifications from your Android apps.

Experiment with Widgets: Some Android apps come with widgets. Add them to your Windows desktop for quick access to information.

Multitask Efficiently: Use multiple desktops to separate work and personal apps. Press Win + Tab to create and switch between desktops.

Security First: Install antivirus software to protect your system from malware that could come from Android apps.

Feedback and Support: If you encounter issues, provide feedback through the Feedback Hub. This helps Microsoft improve the feature.

Explore Alternatives: If an Android app doesn't work well, look for a Windows alternative. Many popular apps have versions for both platforms.

Troubleshooting Android Apps on Windows 11

App not installing? Check if your PC meets the system requirements. Ensure Windows Subsystem for Android is installed. Restart your computer and try again.

App crashing? Update the app and your system. Clear the app cache by going to Settings > Apps > Select the app > Storage > Clear cache. If the problem persists, reinstall the app.

App not opening? Verify your internet connection. Disable any VPN or proxy settings. Restart the Windows Subsystem for Android by going to Settings > Apps > Windows Subsystem for Android > Advanced options > Restart.

App running slow? Close other running applications to free up resources. Increase the RAM allocation for the Windows Subsystem for Android by going to Settings > Apps > Windows Subsystem for Android > Advanced options > Memory allocation.

App not syncing? Ensure your Google account is correctly linked. Check sync settings by going to Settings > Accounts > Google > Account sync. Toggle sync off and on again.

App permissions issue? Go to Settings > Apps > Select the app > Permissions. Enable necessary permissions like storage, camera, or location.

App display problems? Adjust the display settings by going to Settings > Display > Scale and layout. Try different scaling options to see if it resolves the issue.

App notifications not working? Check notification settings by going to Settings > Apps > Select the app > Notifications. Ensure notifications are enabled. Also, check Focus Assist settings to make sure notifications are not being blocked.

App compatibility issues? Some apps may not be fully compatible with Windows 11. Check the app developer's website for any updates or patches. Consider using an alternative app if the issue persists.

Security Tips for Android Apps on Windows 11

Using Android apps on Windows 11 involves data sharing between devices. To maintain privacy, ensure apps come from trusted sources like the Microsoft Store or Google Play. Avoid sideloading apps from unknown websites. Regularly update your operating system and apps to patch security vulnerabilities. Enable two-factor authentication for added protection. Be cautious with permissions; only grant access to necessary features. Use a VPN to encrypt your internet connection, safeguarding data from potential hackers. Regularly review and clear your app cache to remove stored data. Always log out of apps when not in use to prevent unauthorized access.

Comparing Android Apps on Windows 11 with Other Options

Pros:

  1. Integration: Windows 11 allows Android apps to run natively, similar to how macOS integrates iOS apps.
  2. App Availability: Access to a wide range of Android apps, much like Chromebooks.
  3. Performance: Generally smooth performance, comparable to using Android apps on high-end tablets.
  4. Convenience: No need for third-party emulators, unlike older Windows versions.

Cons:

  1. Compatibility: Not all Android apps are optimized for Windows 11, unlike native apps on Android devices.
  2. Resource Usage: Running Android apps can be resource-intensive, similar to using emulators on older PCs.
  3. Updates: App updates might lag behind, unlike direct updates on Android phones.
  4. User Experience: The interface might not be as seamless as on dedicated Android devices.

Alternatives:

  1. Chromebooks: Native support for Android apps with better optimization.
  2. Android Tablets: Direct access to the Google Play Store with full compatibility.
  3. Bluestacks: A popular emulator for running Android apps on Windows, though it can be resource-heavy.
  4. Samsung DeX: Allows a desktop-like experience with Android apps when connected to a monitor.

App not installing? Check if your PC meets the system requirements. Ensure Windows Subsystem for Android is installed. Restart your computer and try again.

App crashing? Update the app and your system. Clear the app cache by going to Settings > Apps > Select the app > Storage > Clear cache. If the problem persists, reinstall the app.

App not opening? Verify your internet connection. Disable any VPN or proxy settings. Restart the Windows Subsystem for Android by going to Settings > Apps > Windows Subsystem for Android > Advanced options > Restart.

App running slow? Close other running applications to free up resources. Increase the RAM allocation for the Windows Subsystem for Android by going to Settings > Apps > Windows Subsystem for Android > Advanced options > Memory allocation.

App not syncing? Ensure your Google account is correctly linked. Check sync settings by going to Settings > Accounts > Google > Account sync. Toggle sync off and on again.

App permissions issue? Go to Settings > Apps > Select the app > Permissions. Enable necessary permissions like storage, camera, or location.

App display problems? Adjust the display settings by going to Settings > Display > Scale and layout. Try different scaling options to see if it resolves the issue.

App notifications not working? Check notification settings by going to Settings > Apps > Select the app > Notifications. Ensure notifications are enabled. Also, check Focus Assist settings to make sure notifications are not being blocked.

App compatibility issues? Some apps may not be fully compatible with Windows 11. Check the app developer's website for any updates or patches. Consider using an alternative app if the issue persists.

Android Apps on Windows 11: Final Thoughts

Running Android apps on Windows 11 opens up a world of possibilities. You can enjoy your favorite mobile games, use productivity tools, and access social media apps right from your PC. The process involves using the Microsoft Store and the Amazon Appstore, making it straightforward for most users. Performance is generally smooth, though some apps might not be fully optimized yet. Regular updates will likely improve compatibility and performance over time. This integration bridges the gap between mobile and desktop experiences, offering more flexibility and convenience. Whether for work or play, having Android apps on your Windows 11 device can enhance your overall experience. Give it a try and see how it fits into your daily routine.

How can I use Android apps on Windows 11?

The best way to install Android apps on Windows 11 is through the Amazon Appstore. You'll need to set up the Windows Subsystem for Android, install the Amazon Appstore app, and enable virtualization if prompted.

Do Android apps work on Windows?

Yes, they do! By signing in with a Google account, you can install and use Android apps in a window on your PC. BlueStacks is a popular option that lets you run multiple Android apps at once.

What is the Windows Subsystem for Android?

It's a feature in Windows 11 that allows you to run Android apps natively. Think of it as a bridge between your PC and Android apps, making them work seamlessly together.

Is the Amazon Appstore the only way to get Android apps on Windows 11?

While the Amazon Appstore is the official method, you can also use emulators like BlueStacks or sideload APK files. However, these methods might require more technical know-how.

Do I need to enable virtualization to run Android apps on Windows 11?

Yes, enabling virtualization is often necessary. This setting can usually be found in your computer's BIOS or UEFI settings. It helps your PC run Android apps more efficiently.

Can I use Google Play Store on Windows 11?

Officially, no. Windows 11 supports the Amazon Appstore, not the Google Play Store. However, some tech-savvy users find workarounds to install the Play Store, but it's not straightforward.

Are there any limitations to using Android apps on Windows 11?

Some apps might not work perfectly due to differences in hardware and software. Also, certain apps that rely heavily on Google services might face issues since Windows 11 uses the Amazon Appstore.

Was this page helpful?